
2.2. Procedure – Configuring keybridging
Purpose:
Keybridging is a method to let the client see a copy of the server's certificate (or vice versa). That way the client can inspect the certificate of the server, and decide about its trustworthiness. If the PNS firewall is proxying the SSL/TLS connection, the client cannot inspect the certificate of the server directly, but you can configure Application-level Gateway to generate a new certificate on-the-fly, using the data in the server's certificate. Application-level Gateway sends this generated certificate to the client. To configure to perform keybridging, complete the following steps.
Steps:
Create the required keys and CA certificates.
Generate two local CA certificates. Application-level Gateway will use one of them to sign the generated certificate for servers having trusted certificates, the other one for servers with untrusted or self-signed certificates. Make this difference visible somewhere in the CA's certificates, for example, in their common name (
CA_for_Untrusted_certs;CA_for_Trusted_certs). These CA certificates can be self-signed, or signed by your local root CA.IMPORTANT: Do NOT set a password for these CAs, as Application-level Gateway must be able to access them automatically.
Import the certificate of the CA signing the trusted certificates to your clients to make the generated certificates 'trusted'.
IMPORTANT: Do NOT import the other CA certificate.
Generate a new certificate. The private key of this keypair will be used in the on-the-fly generated certificates, the public part (DN and similar information) will not be used.
In MC, set the PNS firewall host to be the owner of this certificate, then select .
Python:
Copy the certificates and CRLs to their respective directories (for example, into
/etc/zorp/ssl-bridge/). Note that they are not updated automatically as in configurations managed by MC.
Create and configure an Encryption Policy. Complete the following steps.
Navigate to the MC component of the firewall host.
Select .
Enter a name into the field, for example,
KeybridgingEncryption.Select , then click OK.
Select .
Python:
EncryptionPolicy(
    name="KeybridgingEncryption",
    encryption=TwoSidedEncryption()
)
Double-click , then select .
Python:
     encryption=TwoSidedEncryption(
        client_certificate_generator=DynamicCertificate()
        )
Double-click . The certificates owned by the host will be displayed. Select the one you created in Step 1c, then click OK. MC will automatically fill the value of the parameter to point to the location of the private key file of the certificate.
If the private key of the certificate is password-protected, double-click
passphrase, then enter the passphrase for the private key.Python:
     encryption=TwoSidedEncryption(
         client_certificate_generator=DynamicCertificate(
            private_key=PrivateKey.fromFile(key_file_path="/etc/key.d/SSL-bridge/key.pem")
            )
        )
Double-click
trusted_ca_files > certificate_file_path, select CA that will be used to sign the generated certificates for trusted peers (for example,CA_for_Trusted_certs), then click OK.If the private key of the certificate is password-protected, double-click
private_key_password, then enter the passphrase for the private key.Python:
        client_certificate_generator=DynamicCertificate(
            private_key=PrivateKey.fromFile(key_file_path="/etc/key.d/SSL-bridge/key.pem"),
            trusted_ca=Certificate.fromFile(
                certificate_file_path="/etc/ca.d/certs/CA_for_Trusted_certs.pem",
                private_key=PrivateKey.fromFile("/etc/ca.d/keys/CA_for_Trusted_certs.pem"))
        )
Double-click
untrusted_ca_files, then select CA that will be used to sign the generated certificates for untrusted peers (for example,CA_for_Untrusted_certs).If the private key of the certificate is password-protected, double-click
private_key_password, then enter the passphrase for the private key.Python:
client_certificate_generator=DynamicCertificate( private_key=PrivateKey.fromFile(key_file_path="/etc/key.d/SSL-bridge/key.pem"), trusted_ca=Certificate.fromFile( certificate_file_path="/etc/ca.d/certs/CA_for_Trusted_certs.pem", private_key=PrivateKey.fromFile("/etc/ca.d/keys/CA_for_Trusted_certs.pem")), untrusted_ca=Certificate.fromFile( certificate_file_path="/etc/ca.d/certs/CA_for_Untrusted_certs.pem", private_key=PrivateKey.fromFile("/etc/ca.d/keys/CA_for_Untrusted_certs.pem")) )Python:
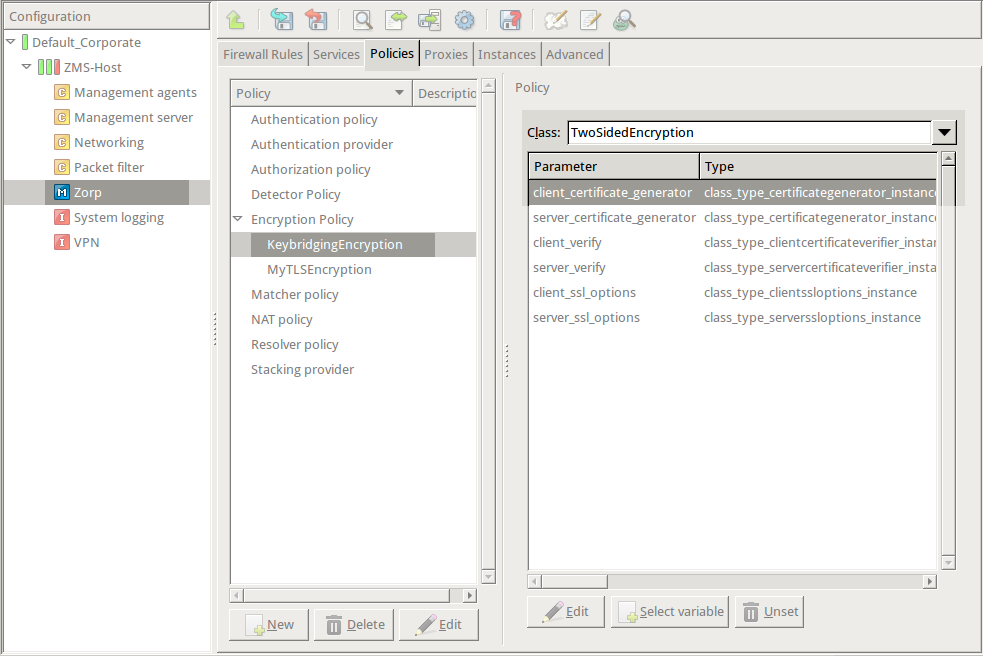
The Encryption Policy configured in the previous steps is summarized in the following code snippet.
EncryptionPolicy(
    name="KeybridgingEncryption",
    encryption=TwoSidedEncryption(
        client_verify=ClientNoneVerifier(),
        client_ssl_options=ClientSSLOptions(),
        server_verify=ServerCertificateVerifier(),
        server_ssl_options=ServerSSLOptions(),
        client_certificate_generator=DynamicCertificate(
            private_key=PrivateKey.fromFile(key_file_path="/etc/key.d/SSL-bridge/key.pem"),
            trusted_ca=Certificate.fromFile(
                certificate_file_path="/etc/ca.d/certs/CA_for_Trusted_certs.pem",
                private_key=PrivateKey.fromFile("/etc/ca.d/keys/CA_for_Trusted_certs.pem")),
            untrusted_ca=Certificate.fromFile(
                certificate_file_path="/etc/ca.d/certs/CA_for_Untrusted_certs.pem",
                private_key=PrivateKey.fromFile("/etc/ca.d/keys/CA_for_Untrusted_certs.pem")
            )
        )
    ))
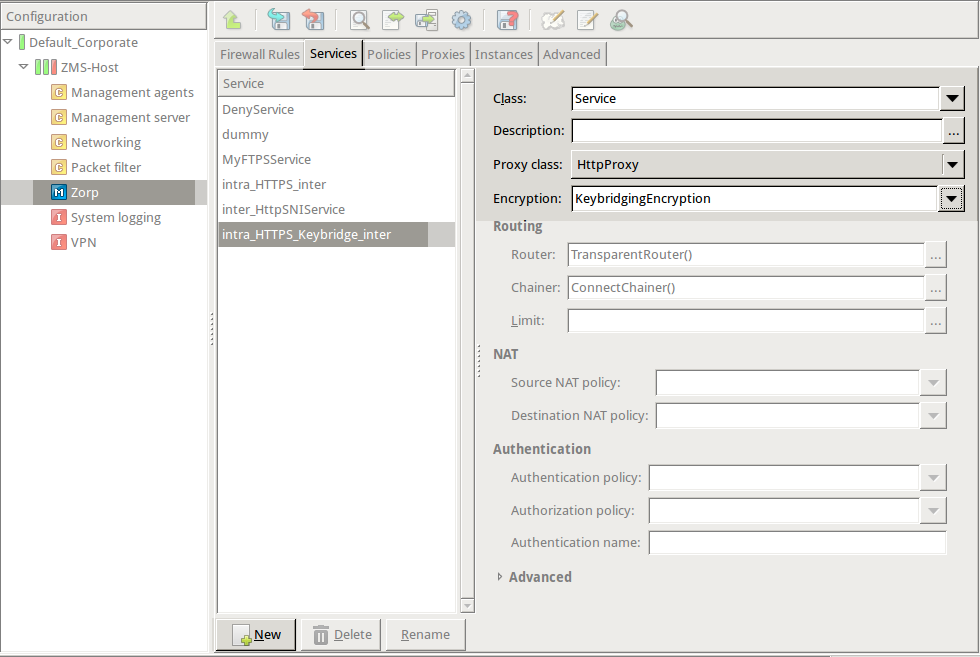
Create a service that uses the Encryption Policy created in the previous step.
Python:
def demo_instance() :
        Service(name='demo/intra_HTTPS_Keybridge_inter', router=TransparentRouter(), chainer=ConnectChainer(), proxy_class=HttpProxy, max_instances=0, max_sessions=0, keepalive=Z_KEEPALIVE_NONE, encryption_policy="KeybridgingEncryption")

    Rule(rule_id=20,
    src_zone=('intra', ),
    dst_zone=('internet', ),
    proto=6,
    service='demo_instance/intra_HTTPS_Keybridge_inter'
    )
Configure other parameters of the Encryption Policy, service, and firewall rule as needed by your environment.
Commit and upload your changes, then restart Application-level Gateway.
Expected result:
Every time a client connects to a previously unknown server, Application-level Gateway will generate a new certificate, sign it with one of the specified CAs, and send it to the client. This new certificate will be stored under
/var/lib/zorp/ssl-bridgeunder a filename based on the original server certificate. If the signer CA is trusted, the client (browser or other application) will accept the connection. If the certificate is signed by the CA for untrusted certificates, the application will not recognize the issuer CA (since its certificate has not been imported to the client) and give a warning to the user. The user can then decide whether the certificate can be accepted or not.(Actually, two files are stored on the firewall for each certificate: the original certificate received from the server, and the generated certificate. When a client connects to the server, the certificate provided by the server is compared to the stored one: if they do not match, a new certificate is generated. For example, this happens when the server certificate has been expired and refreshed.)


Published on June 04, 2020
© 2007-2019 BalaSys
Send your comments to support@balasys.hu
