Copyright © 1996-2024 Balasys IT Zrt. (Private Limited Company)
May 30, 2024
Abstract
This tutorial describes how to configure Zorp to proxy SSL traffic
Table of Contents
This tutorial provides guidelines for Zorp administrators on how to enable proxying secure SSL and TLS connections. Knowledge in TCP/IP and Zorp administration is required to fully comprehend the contents of this paper. The procedures and concepts described here are applicable to version 7 of Zorp. Detailed information is provided to configure Zorp both from Zorp Management Console and using Python scripts.
Note that explaining the concepts of the different aspects of SSL/TLS proxying is beyond the scope of this tutorial. For background information, see the following documents:
For details on deriving and modifying proxies, see Section 6.6, Proxy classes in Zorp Professional 7 Administrator Guide.
For an overview on certificates and related topics in connection with Zorp, see Chapter 11, Key and certificate management in Zorp in Zorp Professional 7 Administrator Guide.
For details on the available SSL-related attributes of the Zorp proxies, see Section 3.2, Handling TLS and SSL connections in Zorp in Zorp Professional 7 Reference Guide
You can download the above documents at the Balasys Documentation Page.
Zorp can be fully configured using either the graphical Zorp Management Console (ZMC) or manually by editing plain text Python configuration files. The suggestions and the background information provided in this tutorial are equally applicable to both methods. Step-by-step explanation with screenshots are given for ZMC-based configuration, while sample Python code lines can be found at the end of each step. After replacing the sample parameters (for example, IP addresses) with the proper ones for the actual configuration, add these lines to the policy file of Zorp (usually found under /etc/zorp/policy.py). Also pay attention to the proper indentation of Python code lines. For more details, see Chapter 10, Local firewall administration in Zorp Professional 7 Administrator Guide.
If Zorp Management Console is used and the Python code generated by ZMC needs to be displayed, select a host, then select from the main menu.
For proxying connections embedded in SSL, a properly configured proxy for the embedded protocol is required — the best way is to derive an own proxy class and modify its parameters, but you can use a built-in proxy (for example, the HttpProxy for HTTPS traffic) if its default behavior is acceptable for you. The SSL-framework validates the certificate of the server, decrypts the secure channel, then passes the data to the proxy. To transfer traffic that does not have a native proxy, or to inspect only the SSL connection without analyzing the embedded protocol, use PlugProxy.
For details on deriving and modifying proxies, see Section 6.6, Proxy classes in Zorp Professional 7 Administrator Guide.
The following procedure describes how to configure Zorp proxies to handle SSL/TLS connections. For the configuration examples, an Http proxy will be used to inspect HTTPS connections — you can use other proxies similarly to inspect IMAPS, POP3S, and other types of traffic.
2.1. Procedure – Enabling SSL-encryption in the connection
Purpose:
To proxy HTTPS connections, configure an Encryption Policy to handle SSL/TLS connections, and use this Encryption Policy in your Service. The policy will be configured to:
Require the client and the server to use strong encryption algorithms, the use of weak algorithms will not be permitted.
Enable connections only to servers with certificates signed by CAs that are in the trusted CAs list of the Zorp firewall node. (For details on managing trusted CA groups, see Section 11.3.7.3, Managing trusted groups in Zorp Professional 7 Administrator Guide.)
The clients will only see the certificate of Zorp. To allow the clients to access the certificate information of the server, see Procedure 2.2, Configuring keybridging.
Steps:
-
Generate a certificate for your firewall. The Zorp component requires its own certificate and keypair to perform SSL/TLS proxying.
ZMC: Create a certificate, set the firewall as the owner host of the certificate, then distribute it to the firewall host. For details, see Chapter 11, Key and certificate management in Zorp in Zorp Professional 7 Administrator Guide.
Python: In configurations managed manually from python, create an X.509 certificate (with its related keypair) using a suitable software (for example, OpenSSL) and deploy it to the Zorp firewall host (for example, copy it to the
/etc/key.d/mycertfolder). -
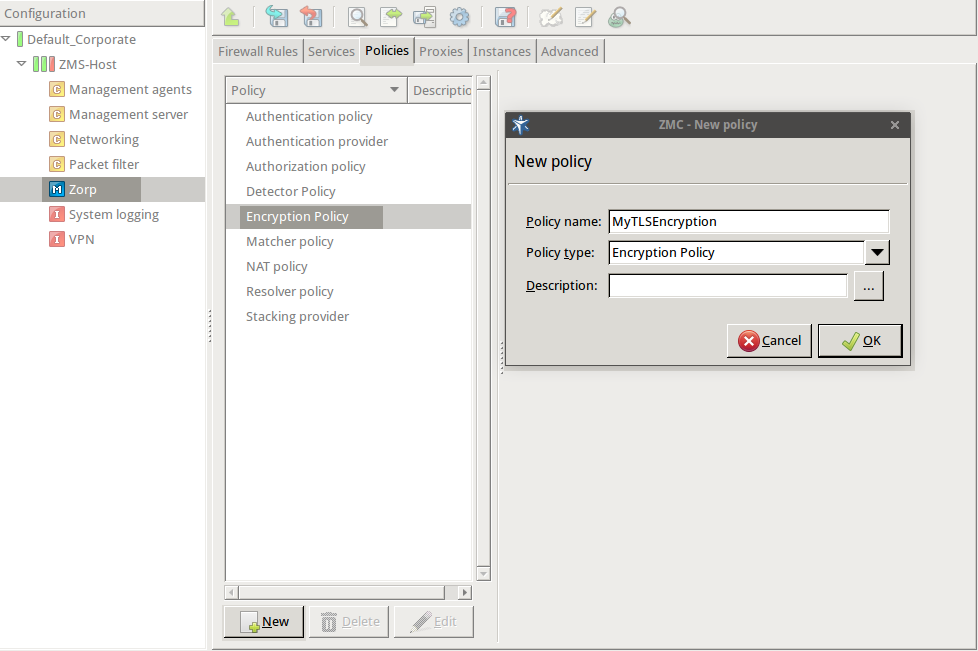
Create and configure an Encryption Policy. Complete the following steps.
Navigate to the ZMC component of the firewall host.
Select .
-
Enter a name into the field, for example,
MyTLSEncryption.
Select , then click OK.
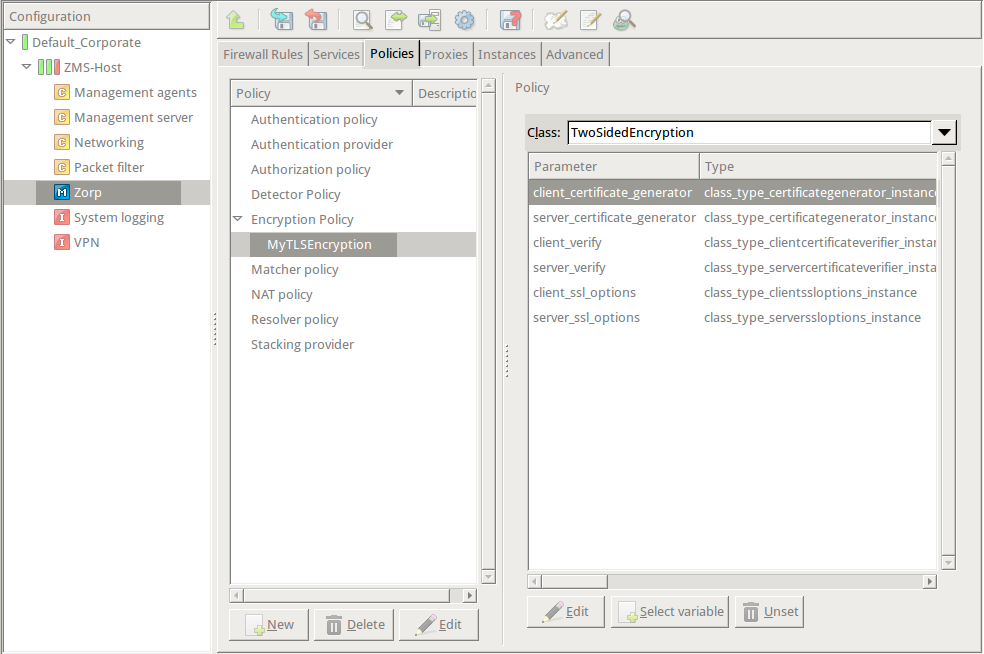
-
Select .
Python:
EncryptionPolicy( name="MyTLSEncryption", encryption=TwoSidedEncryption() ) -
Double-click , then select .
-
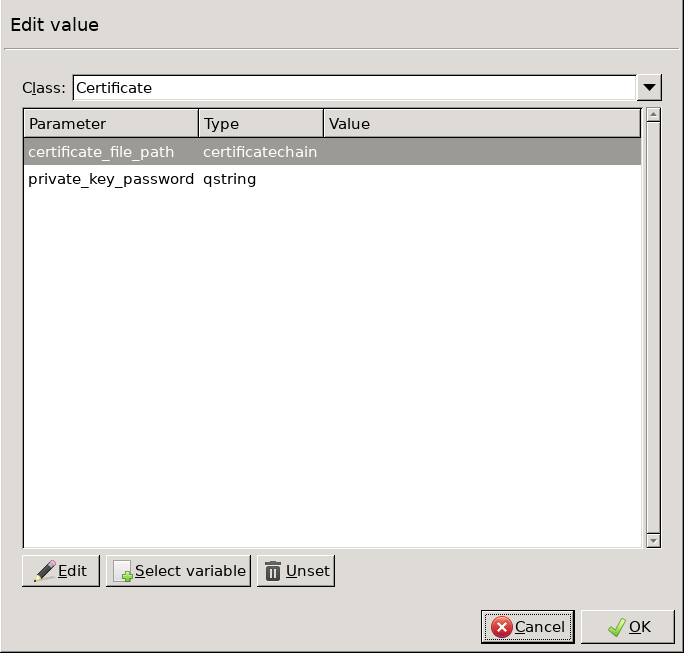
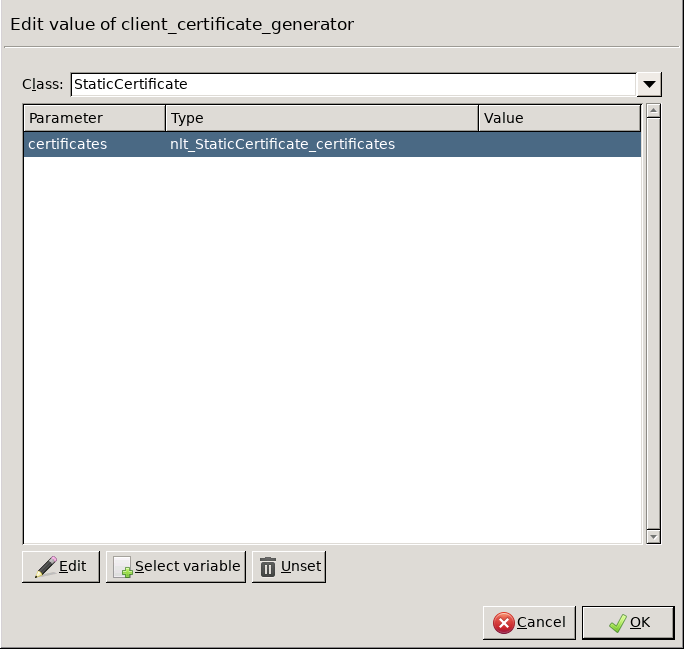
Double-click the and click to add a certificate entry to a list of certificates.
-
Double-click the . A window displaying the certificates owned by the host will open up. The lower section of the window shows the information contained in the certificate. Select the list of certificates Zorp is required to show to the clients (for example, the certificate created in Step 1), then click .
Python:
    encryption=TwoSidedEncryption(
        client_certificate_generator=StaticCertificate(
            certificates=(
                Certificate.fromFile(
                    certificate_file_path="/etc/key.d/ZMS_Engine/cert.pem",
                    private_key=PrivateKey.fromFile(
                        "/etc/key.d/ZMS_Engine/key.pem")
                ),
            )
        )
    )
If the private key of the certificate is password-protected, double-click , type the password, then click OK. Otherwise, click OK.
-
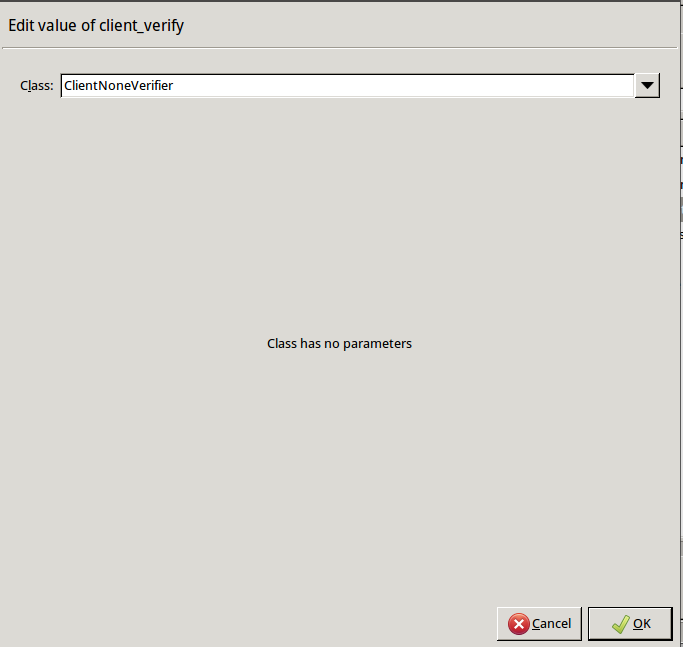
Disable mutual authentication. That way, Zorp will not request a certificate from the clients.
Double-click , select , then click OK.
Python:
encryption=TwoSidedEncryption( client_verify=None ) -
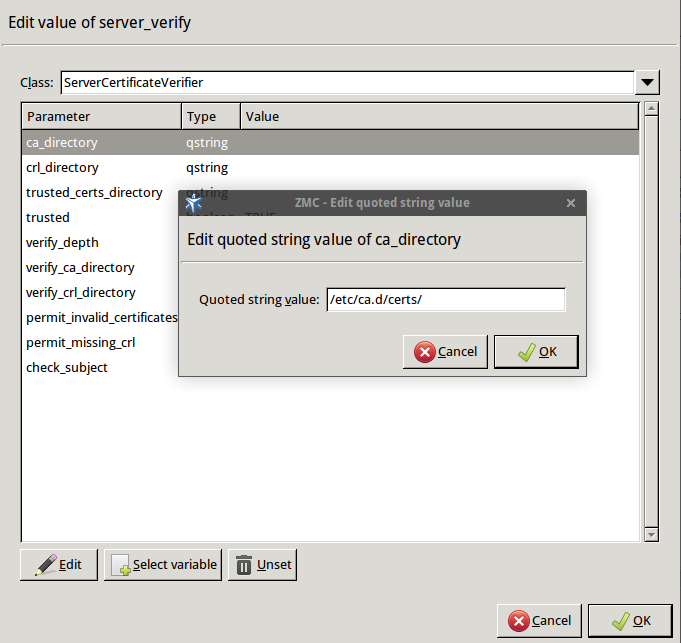
Specify the directory containing the certificates of the trusted CAs. These settings determine which servers can the clients access: the clients will be able to connect only those servers via SSL/TLS which have certificate signed by one of these CAs (or a lower level CA in the CA chain).
Double-click , double-click , then type the path and name to the directory that stores the trusted CA certificates, for example,
/etc/ca.d/certs/. Click OK.Python:
    encryption=TwoSidedEncryption(
        server_verify=ServerCertificateVerifier(
            ca_directory="/etc/ca.d/certs/"
        )
    )
Note CAs cannot be referenced directly, only the trusted group containing them. For details on managing trusted groups, see Section 11.3.7.3, Managing trusted groups in Zorp Professional 7 Administrator Guide.
-
Specify the directory containing the CRLs of the trusted CAs.
Double-click , then type the path and name to the directory that stores the CRLs of the trusted CA certificates, for example,
/etc/ca.d/crls/. Click OK.Python:
encryption=TwoSidedEncryption( server_verify=ServerCertificateVerifier( ca_directory="/etc/ca.d/certs/", crl_directory="/etc/ca.d/crls/" ) ) -
Optional Step: The Common Name in the certificate of a server or webpage is usually its domain name or URL. By default, Zorp compares this Common Name to the actual domain name it receives from the server, and rejects the connection if they do not match. That way it is possible to detect several types of false certificates and prevent a number of phishing attacks. If this mode of operation interferes with your environment, and you cannot use certificates that have proper Common Names, disable this option.
Double-click , select
FALSE, then click OK.Python:
encryption=TwoSidedEncryption( server_verify=ServerCertificateVerifier( ca_directory="/etc/ca.d/certs/", crl_directory="/etc/ca.d/crls/", check_subject=FALSE ) ) -
Optional Step: Forbid the use of weak encryption algorithms to increase security. The related parameters can be set separately for the client and the server-side of Zorp, using the and parameters of the Encryption Policy. Disabling weak algorithms also eliminates the risk of downgrade attacks, where the attacker modifies the SSL session-initiation messages to force using weak encryption that can be easily decrypted by a third party.
Note Certain outdated operating systems, or old browser applications do not properly support strong encryption algorithms. If your clients use such systems or applications, it might be required to permit weak encryption algorithms.
-
SSL methods may occasionally fall back to older (thus weaker) protocol versions if one of the peers does not support the newer version. To avoid this situation, explicitly disable undesired protocol versions (SSLv2 and SSLv3 are disabled by default).
For example, to disable TLSv1, double-click , click
TRUE, then click OK. Repeat this step for the parameter.
Python:
encryption=TwoSidedEncryption( server_ssl_options=ServerSSLOptions( disable_tlsv1=TRUE) client_ssl_options=ClientSSLOptions( disable_tlsv1=TRUE) ) -
-
Optional Step: Enable untrusted certificates. Since a significant number of servers use self-signed certificates (with unverifiable trustworthiness), in certain situations it might be needed to permit access to servers that have untrusted certificates.
Note When an untrusted certificate is accepted, the generated certificates will be signed with the untrusted CA during keybridge scenarios. For details on configuring keybridging, see Procedure 2.2, Configuring keybridging
Double-click , click the drop-down menu and select
UNTRUSTED, then click OK.Note When the value is
NONE, even the invalid certificates are accepted and at the client side there is no client certificate request sent to the client.Python:
    encryption=TwoSidedEncryption(
        server_verify=ServerCertificateVerifier(
            trust_level=TLS_TRUST_LEVEL_UNTRUSTED
        )
    )
Python:
The Encryption Policy configured in the previous steps is summarized in the following code snippet.
EncryptionPolicy( name="MyTLSEncryption", encryption=TwoSidedEncryption( client_verify=ClientNoneVerifier(), client_ssl_options=ClientSSLOptions(), server_verify=ServerCertificateVerifier( trust_level=TLS_TRUST_LEVEL_FULL, intermediate_revocation_check_type = TLS_INTERMEDIATE_REVOCATION_SOFT_FAIL, leaf_revocation_check_type = TLS_LEAF_REVOCATION_SOFT_FAIL, trusted_certs_directory="", verify_depth=4, verify_ca_directory="/etc/ca.d/certs/", verify_crl_directory="/etc/ca.d/crls/", check_subject=TRUE ), server_ssl_options=ServerSSLOptions(), client_certificate_generator=StaticCertificate( certificates=( Certificate.fromFile( certificate_file_path= "/etc/key.d/ZMS_Engine/cert.chain.pem", private_key=PrivateKey.fromFile( "/etc/key.d/ZMS_Engine/key.pem")), )) )) -
Select .
Note when managing Zorp without ZMC, copy the certificates and CRLs to their respective directories. They are not updated automatically as in configurations managed by ZMC.
By performing the above steps, the proxy has been configured to use the specified certificate and its private key, and also the directory has been set that will store the certificates of the trusted CAs and their CRLs. Client authentication has also been disabled.
-
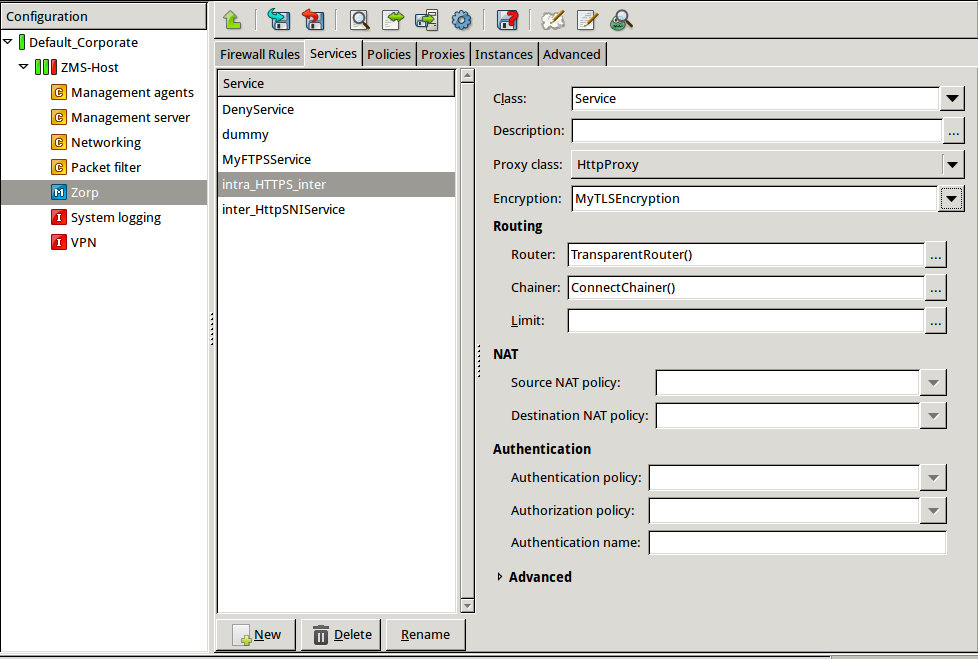
Create a service that clients can use to access the Internet in a secure channel. This service will use the
MyTLSEncryptionEncryption Policy.Select , enter a name for the service (for example,
intra_HTTPS_inter), then click OK.Select .
Select .
Configure the other parameters of the service as neecessary for the environment, then click .
Select , and select the service created in the previous step. For more details on creating firewall rules, see Section 6.5, Configuring firewall rules in Zorp Professional 7 Administrator Guide.
Configure the other parameters of the rule as necessary for the environment, then click .
Python:
def demo() : Service( name='demo/intra_HTTPS_inter', router=TransparentRouter(), chainer=ConnectChainer(), proxy_class=HttpProxy, max_instances=0, max_sessions=0, keepalive=Z_KEEPALIVE_NONE, encryption_policy="MyTLSEncryption" ) Rule( rule_id=300, src_subnet=('192.168.1.1/32', ), dst_zone=('internet', ), proto=6, service='demo/intra_HTTPS_inter' ) -
Commit and upload the changes, then restart Zorp.
Expected result:
Every time a client connects to a server, Zorp checks the certificate of the server. If the signer CA is trusted, Zorp shows a trusted certificate to the client (browser or other application). If the certificate of the server is untrusted, Zorp shows an untrusted certificate to the client, giving a warning to the user. The user can then decide whether the certificate can be accepted or not.

2.2. Procedure – Configuring keybridging
Purpose:
Keybridging is a method to let the client see a copy of the server's certificate (or vice versa). That way the client can inspect the certificate of the server, and decide about its trustworthiness. If the Zorp firewall is proxying the SSL/TLS connection, the client cannot inspect the certificate of the server directly, but you can configure Zorp to generate a new certificate on-the-fly, using the data in the server's certificate. Zorp sends this generated certificate to the client. To configure to perform keybridging, complete the following steps.
Steps:
-
Create the required keys and CA certificates.
-
Generate two local CA certificates. Zorp will use one of them to sign the generated certificate for servers having trusted certificates, the other one for servers with untrusted or self-signed certificates. Make this difference visible somewhere in the CA's certificates, for example, in their common name (
CA_for_Untrusted_certs;CA_for_Trusted_certs). These CA certificates can be self-signed, or signed by your local root CA.IMPORTANT: Do NOT set a password for these CAs, as Zorp must be able to access them automatically.
-
Import the certificate of the CA signing the trusted certificates to your clients to make the generated certificates 'trusted'.
IMPORTANT: Do NOT import the other CA certificate.
Generate a new certificate. The private key of this keypair will be used in the on-the-fly generated certificates, the public part (DN and similar information) will not be used.
-
In ZMC, set the Zorp firewall host to be the owner of this certificate, then select .
Python:
Copy the certificates and CRLs to their respective directories (for example, into
/etc/zorp/ssl-bridge/). Note that they are not updated automatically as in configurations managed by ZMC.
-
-
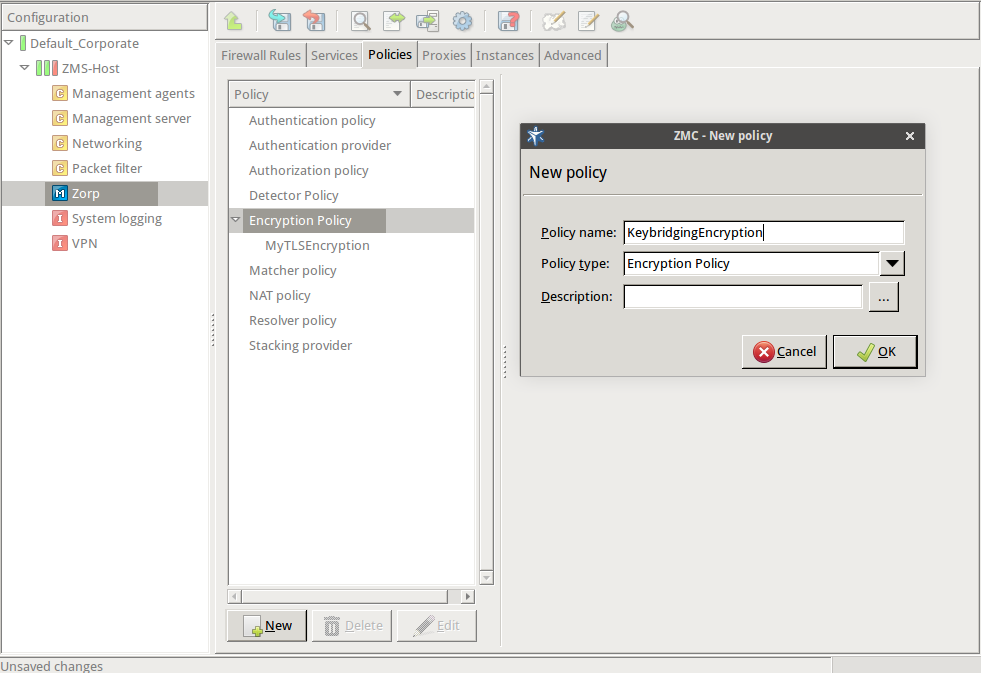
Create and configure an Encryption Policy. Complete the following steps.
Navigate to the ZMC component of the firewall host.
Select .
-
Enter a name into the field, for example,
KeybridgingEncryption.
Select , then click OK.
-
Select .
Python:
EncryptionPolicy( name="KeybridgingEncryption", encryption=TwoSidedEncryption() ) -
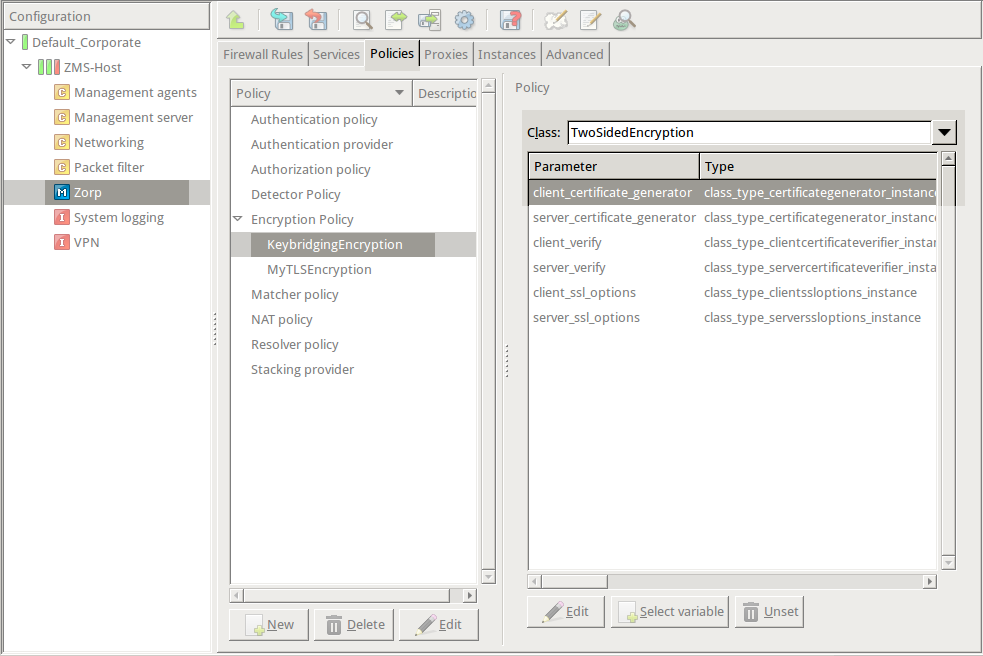
Double-click , then select .
Python:
encryption=TwoSidedEncryption( client_certificate_generator=DynamicCertificate() ) -
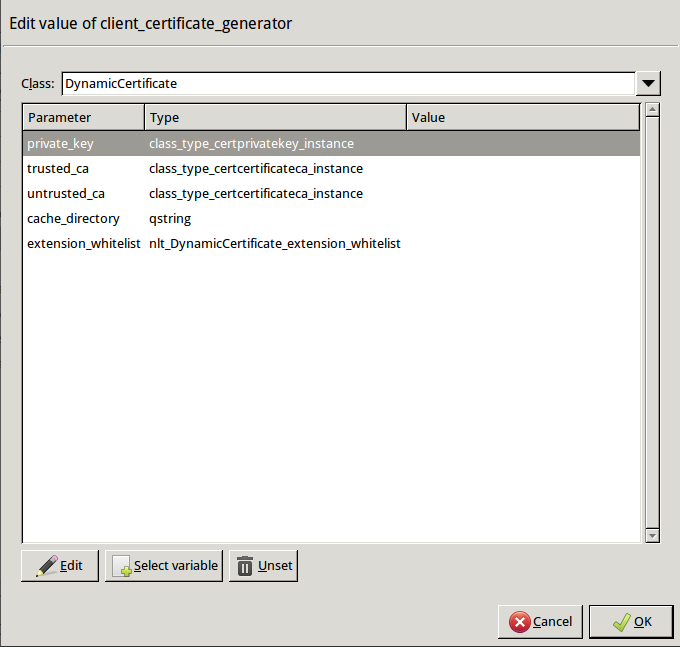
Double-click . The certificates owned by the host will be displayed. Select the one you created in Step 1c, then click OK. ZMC will automatically fill the value of the parameter to point to the location of the private key file of the certificate.
If the private key of the certificate is password-protected, double-click
passphrase, then enter the passphrase for the private key.Python:
encryption=TwoSidedEncryption( client_certificate_generator=DynamicCertificate( private_key=PrivateKey.fromFile(key_file_path="/etc/key.d/SSL-bridge/key.pem") ) ) -
Double-click
trusted_ca_files > certificate_file_path, select CA that will be used to sign the generated certificates for trusted peers (for example,CA_for_Trusted_certs), then click OK.If the private key of the certificate is password-protected, double-click
private_key_password, then enter the passphrase for the private key.Python:
client_certificate_generator=DynamicCertificate( private_key=PrivateKey.fromFile(key_file_path="/etc/key.d/SSL-bridge/key.pem"), trusted_ca=Certificate.fromFile( certificate_file_path="/etc/ca.d/certs/CA_for_Trusted_certs.pem", private_key=PrivateKey.fromFile("/etc/ca.d/keys/CA_for_Trusted_certs.pem")) ) -
Double-click
untrusted_ca_files, then select CA that will be used to sign the generated certificates for untrusted peers (for example,CA_for_Untrusted_certs).If the private key of the certificate is password-protected, double-click
private_key_password, then enter the passphrase for the private key.Python:
client_certificate_generator=DynamicCertificate( private_key=PrivateKey.fromFile(key_file_path="/etc/key.d/SSL-bridge/key.pem"), trusted_ca=Certificate.fromFile( certificate_file_path="/etc/ca.d/certs/CA_for_Trusted_certs.pem", private_key=PrivateKey.fromFile("/etc/ca.d/keys/CA_for_Trusted_certs.pem")), untrusted_ca=Certificate.fromFile( certificate_file_path="/etc/ca.d/certs/CA_for_Untrusted_certs.pem", private_key=PrivateKey.fromFile("/etc/ca.d/keys/CA_for_Untrusted_certs.pem")) )Python:
The Encryption Policy configured in the previous steps is summarized in the following code snippet.
EncryptionPolicy(
    name="KeybridgingEncryption",
    encryption=TwoSidedEncryption(
        client_verify=ClientNoneVerifier(),
        client_ssl_options=ClientSSLOptions(),
        server_verify=ServerCertificateVerifier(),
        server_ssl_options=ServerSSLOptions(),
        client_certificate_generator=DynamicCertificate(
            private_key=PrivateKey.fromFile(key_file_path="/etc/key.d/SSL-bridge/key.pem"),
            trusted_ca=Certificate.fromFile(
                certificate_file_path="/etc/ca.d/certs/CA_for_Trusted_certs.pem",
                private_key=PrivateKey.fromFile("/etc/ca.d/keys/CA_for_Trusted_certs.pem")),
            untrusted_ca=Certificate.fromFile(
                certificate_file_path="/etc/ca.d/certs/CA_for_Untrusted_certs.pem",
                private_key=PrivateKey.fromFile("/etc/ca.d/keys/CA_for_Untrusted_certs.pem")
            )
        )
    ))
-
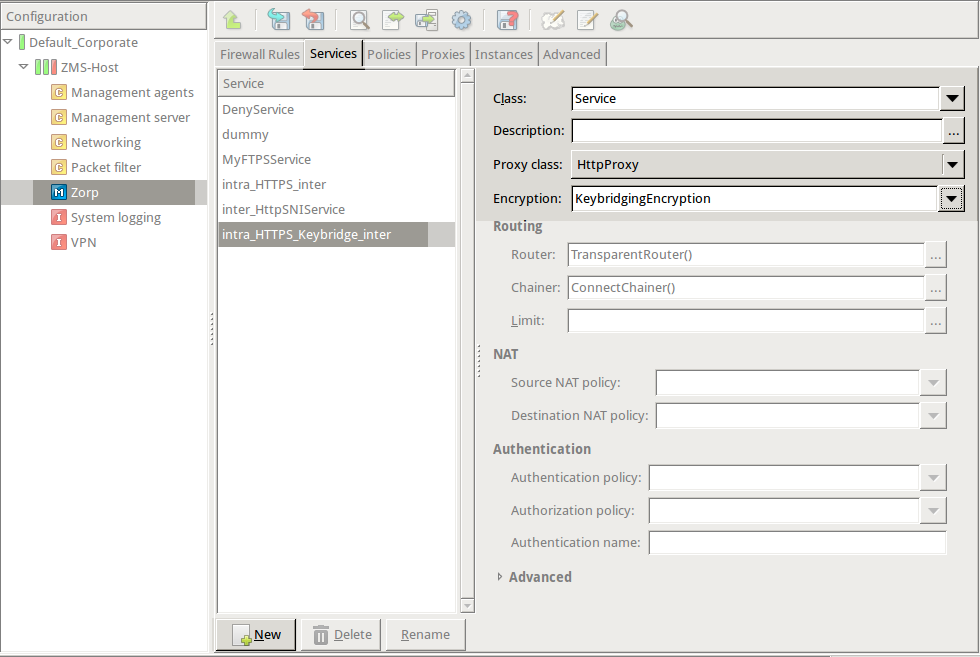
Create a service that uses the Encryption Policy created in the previous step.
Python:
def demo_instance() :
        Service(name='demo/intra_HTTPS_Keybridge_inter', router=TransparentRouter(), chainer=ConnectChainer(), proxy_class=HttpProxy, max_instances=0, max_sessions=0, keepalive=Z_KEEPALIVE_NONE, encryption_policy="KeybridgingEncryption")

    Rule(rule_id=20,
    src_zone=('intra', ),
    dst_zone=('internet', ),
    proto=6,
    service='demo_instance/intra_HTTPS_Keybridge_inter'
    )
Configure other parameters of the Encryption Policy, service, and firewall rule as needed by your environment.
-
Commit and upload the changes, then restart Zorp.
Expected result:
Every time a client connects to a previously unknown server, Zorp will generate a new certificate, sign it with one of the specified CAs, and send it to the client. This new certificate will be stored under
/var/lib/zorp/ssl-bridgeunder a filename based on the original server certificate. If the signer CA is trusted, the client (browser or other application) will accept the connection. If the certificate is signed by the CA for untrusted certificates, the application will not recognize the issuer CA (since its certificate has not been imported to the client) and give a warning to the user. The user can then decide whether the certificate can be accepted or not.(Actually, two files are stored on the firewall for each certificate: the original certificate received from the server, and the generated certificate. When a client connects to the server, the certificate provided by the server is compared to the stored one: if they do not match, a new certificate is generated. For example, this happens when the server certificate has been expired and refreshed.)
Certain situations require client-side or mutual authentication that might not be proxied appropriately, therefore you have to allow them to pass the firewall using a plug proxy. This situation arises most commonly in secure banking and online ordering sites that use HTTPS, or with dedicated client-server applications (such as WindowsUpdate). To maintain a list of such sites, use one of the following methods:
If the IP address of the affected servers is static, add them to a separate zone. For details, see Procedure 2.3.1, IP filtering using a zone.
Use a MatcherPolicy. Matcher policies can compare the IP address of the target server to a predefined list, and can be configured to behave differently if a match is found or not. Another example will use a domain-name-matcher policy to resolve domain names that have dynamic IPs, or change their addresses periodically (for example, they use DNS round-robin method). Matcher policies are a bit more resource intensive, but easier to use and maintain after the initial configuration. If nothing restricts it, use a matcher policy.
Use a DetectorService to select which service to start based on the traffic parameters. For details, see Section 6.7.2, Detector policies in Zorp Professional 7 Administrator Guide and Procedure 6.4.4, Creating a new DetectorService in Zorp Professional 7 Administrator Guide.
More sophisticated configurations using both types of whitelisting can be also implemented based on the following examples.
2.3.1. Procedure – IP filtering using a zone
Purpose:
Firewall rules can select the service to be started based on the zone that the server and the client belongs to. Zones are organized based on IP addresses, the rule specifies which clients can use which services to access the specified servers. To create whitelists using a zone, complete the following steps.
Steps:
-
Create a zone containing only the servers that require client-side authentication (or that have other reasons why the connection cannot be proxied).
Select the site that contains the firewall host, then click , and create a new zone (for example,
banks).-
Select the newly created zone, and add a network to the zone, that is, specify the and of the target servers. Include only the servers that you want to be available via encrypted but not proxied channels.
Note You will also need a client zone. You can use the entire intranet or a smaller zone, as required. Create a new zone for the clients if you want to make these servers available only to certain clients.
-
Create a new service.
Select your firewall host, navigate to , then click .
Create a new service, for example,
intra_PLUG_banks.Select .
Specify other service parameters as required for your environment.
-
Create a firewall rule that uses the zones and the service created in the previous steps.
Select , and select the service created in the previous step. For more details on creating firewall rules, see Section 6.5, Configuring firewall rules in Zorp Professional 7 Administrator Guide.
Select , and select the zone from which the clients will connect to the servers (for example,
intranet).Select , and select the zone that contains the whitelisted servers (for example,
banks).Configure the other parameters of the rule as needed for your environment, then click .
Commit and upload your changes, then restart Zorp.
When configured according to this tutorial, the policy.py file of Zorp should look something like this:
Configuring SSL proxying:
EncryptionPolicy(
    name="MyTLSEncryption",
    encryption=TwoSidedEncryption(
        client_verify=ClientNoneVerifier(),
        client_ssl_options=ClientSSLOptions(),
        server_verify=ServerCertificateVerifier(
            ca_directory="/etc/ca.d/certs/",
            crl_directory="/etc/ca.d/crls/",
            trusted=TRUE, verify_depth=4,
            permit_invalid_certificates=FALSE,
            permit_missing_crl=FALSE,
            check_subject=TRUE
            ),
        server_ssl_options=ServerSSLOptions(
            method=SSL_METHOD_TLSV1,
            cipher=SSL_CIPHERS_HIGH, timeout=300,
            disable_sslv2=TRUE, disable_sslv3=FALSE,
            disable_tlsv1=FALSE, disable_tlsv1_1=FALSE,
            disable_tlsv1_2=FALSE,
            ),
        client_certificate_generator=StaticCertificate(
            certificates=(
                Certificate.fromFile(
                    certificate_file_path="/etc/key.d/ZMS_Engine/cert.pem",
                    private_key=PrivateKey.fromFile(
                        "/etc/key.d/ZMS_Engine/key.pem")),
            ))
        ))


    def demo() :
    Service(
        name='demo/intra_HTTPS_inter',
        router=TransparentRouter(),
        chainer=ConnectChainer(),
        proxy_class=HttpProxy,
        max_instances=0,
        max_sessions=0,
        keepalive=Z_KEEPALIVE_NONE,
        encryption_policy="MyTLSEncryption"
    )

    Rule(
        rule_id=300,
        src_subnet=('192.168.1.1/32', ),
        dst_zone=('internet', ),
        proto=6,
        service='demo/intra_HTTPS_inter'
    )
If keybridging is performed:
EncryptionPolicy(
    name="KeybridgingEncryption",
    encryption=TwoSidedEncryption(
        client_verify=ClientNoneVerifier(),
        client_ssl_options=ClientSSLOptions(),
        server_verify=ServerCertificateVerifier(),
        server_ssl_options=ServerSSLOptions(),
        client_certificate_generator=DynamicCertificate(
            private_key=PrivateKey.fromFile(key_file_path="/etc/key.d/SSL-bridge/key.pem"),
            trusted_ca=Certificate.fromFile(
                certificate_file_path="/etc/ca.d/certs/CA_for_Trusted_certs.pem",
                private_key=PrivateKey.fromFile("/etc/ca.d/keys/CA_for_Trusted_certs.pem")),
            untrusted_ca=Certificate.fromFile(
                certificate_file_path="/etc/ca.d/certs/CA_for_Untrusted_certs.pem",
                private_key=PrivateKey.fromFile("/etc/ca.d/keys/CA_for_Untrusted_certs.pem")),
            cache_directory="/var/lib/zorp/ssl-bridge")
    ))


    def demo_instance() :
        Service(name='demo/intra_HTTPS_Keybridge_inter', router=TransparentRouter(), chainer=ConnectChainer(), proxy_class=HttpProxy, max_instances=0, max_sessions=0, keepalive=Z_KEEPALIVE_NONE, encryption_policy="KeybridgingEncryption")

    Rule(rule_id=20,
    src_zone=('intra', ),
    dst_zone=('internet', ),
    proto=6,
    service='demo_instance/intra_HTTPS_Keybridge_inter'
    )
This tutorial has shown how to configure Zorp to proxy encrypted SSL/TLS traffic, including scenarios where keybridging is used. Although these examples are relatively simple, they provide a solid base from which more complex configurations can be built — just as the security policy of your organization requires it.[1]
[1] All questions, comments or inquiries should be directed to <info@balasys.hu> or by post to the following address: BalaSys IT Ltd. 1117 Budapest, Alíz Str. 4 Phone: +36 1 646 4740 Web: https://www.balasys.hu/
Copyright © 2024 BalaSys IT Ltd. All rights reserved.
The latest version is always available at the Balasys Documentation Page.