Copyright © 2021 Balasys IT Security
Copyright © 2021 Balasys IT Security This document is protected by copyright and is distributed under licenses restricting its use, copying, distribution, and decompilation. No part of this document may be reproduced in any form by any means without prior written authorization of Balasys.
This documentation and the product it describes are considered protected by copyright according to the applicable laws.
This product includes software developed by the OpenSSL Project for use in the OpenSSL Toolkit (http://www.openssl.org/). This product includes cryptographic software written by Eric Young (eay@cryptsoft.com)
Linux™ is a registered trademark of Linus Torvalds.
Windows™ 10 is registered trademarks of Microsoft Corporation.
The Balasys™ name and the Balasys™ logo are registered trademarks of Balasys IT Security
The PNS™ name and the PNS™ logo are registered trademarks of Balasys IT Security
AMD Ryzen™ and AMD EPYC™ are registered trademarks of Advanced Micro Devices, Inc.
Intel® Core™ and Intel® Xeon™ are trademarks of Intel Corporation or its subsidiaries in the U.S. and/or other countries.
All other product names mentioned herein are the trademarks of their respective owners.
DISCLAIMER
Balasys is not responsible for any third-party websites mentioned in this document. Balasys does not endorse and is not responsible or liable for any content, advertising, products, or other material on or available from such sites or resources. Balasys will not be responsible or liable for any damage or loss caused or alleged to be caused by or in connection with use of or reliance on any such content, goods, or services that are available on or through any such sites or resources.
May 19, 2026
Abstract
This document describes how to install and configure the Authentication Agent.
Table of Contents
- 1. Introduction
- 2. Authentication and PNS
- 3. Installing the Authentication Agent (AA)
- 4. Configuring Authentication Agent (AA)
- 4.1. Configuring Authentication Agent on Microsoft Windows platforms
- 4.1.1. Registry entries on Microsoft Windows platforms
- 4.1.2. Command line parameters on Microsoft Windows platforms
- 4.1.3. Configuring TLS connections on Microsoft Windows platforms
- 4.1.4. Configuring X.509 certificate based authentication on Microsoft Windows platforms
- 4.1.5. Configuring Group Policy Object (GPO) deployment
- 4.1.6. Enabling Kerberos authentication in AS
- 4.2. Configuring AA on GNU/Linux platforms
- 5. Using the Authentication Agent (AA)
- 6. Configuring Authentication Agent preferences
- 7. Starting and stopping Authentication Agent
List of Procedures
- 2.2. Outband authentication with PNS
- 3.1.1. Installing the Authentication Agent on Microsoft Windows
- 3.1.2. Installing Authentication Agent with Group Policy Object (GPO) deployment
- 3.2. Using AA on GNU/Linux platforms
- 4.1.3.1. Encrypting the communication between PNS and the Authentication Agent on Microsoft Windows platforms
- 4.1.3.2. Importing the CA certificate manually
- 4.1.3.3. Importing the CA certificate using Microsoft Management Console (MMC)
- 4.1.4. Configuring X.509 certificate based authentication on Microsoft Windows platforms
- 4.1.5. Configuring Group Policy Object (GPO) deployment
- 4.1.6. Enabling Kerberos authentication in AS
- 4.2.2.1. Encrypting the communication between PNS and the Authentication Agent on GNU/Linux platforms
Developed by Balasys, Authentication Agent (AA) is an authentication client, capable of cooperating with the PNS firewall and the Authentication Server (AS) to identify the users initiating network connections. Authentication Agent enables the complete network traffic to be audited on the user level.
Authentication Agent (AA) is an authentication client, capable of cooperating with the PNS firewall and the Authentication Server (AS) to identify the users initiating network connections. The authentication process and the related communication between the components is summarized below. For more details, see Chapter 15, Connection authentication and authorization in Proxedo Network Security Suite 2 Administrator Guide.
The authentication aims to determine the identity of the user. During the authentication process the user initiating the connection shares a piece of sensitive information (for example, a password) with the other party that verifies the user's authenticity.
Several procedures (so called authentication methods) exist for verifying the identity of the user:
The user owns some pieces of sensitive information, for example, a password, PIN code, the response to a challenge, and so on.
The user owns a device, for example, a hardware key, chipcard, SecurID token, and so on.
Naturally, the above methods can be combined to implement strong two-factor level authentication in sensitive environments.
The aim of network authentication is to authenticate the connections initiated by the users in order to ensure that only the proper users can access the services. Basically there are two types of authentication:
Inband: Authentication is performed by the application-level protocol — the data traffic required for the authentication is part of the protocol. Inband authentication is used for example in the HTTP, FTP, or SSH protocols. The protocols usually support different authentication methods — these are usually described in the specifications of the protocol.
Outband: Authentication is performed in a separate data channel completely independent from the protocol of the accessed service. Outband authentication is realized by the combination of the Authentication Agent (AA), Authentication Server (AS), and PNS softwares. The advantage of outband authentication is that it can be used to authenticate any protocol, regardless of the authentication methods supported by the original protocol. That way, strong authentication methods (for example, chipcards) can be used to authenticate protocols supporting only the weak username/password method (for example, HTTP).
2.2. Procedure – Outband authentication with PNS
Purpose:
PNS implements outband authentication according to the following procedure:
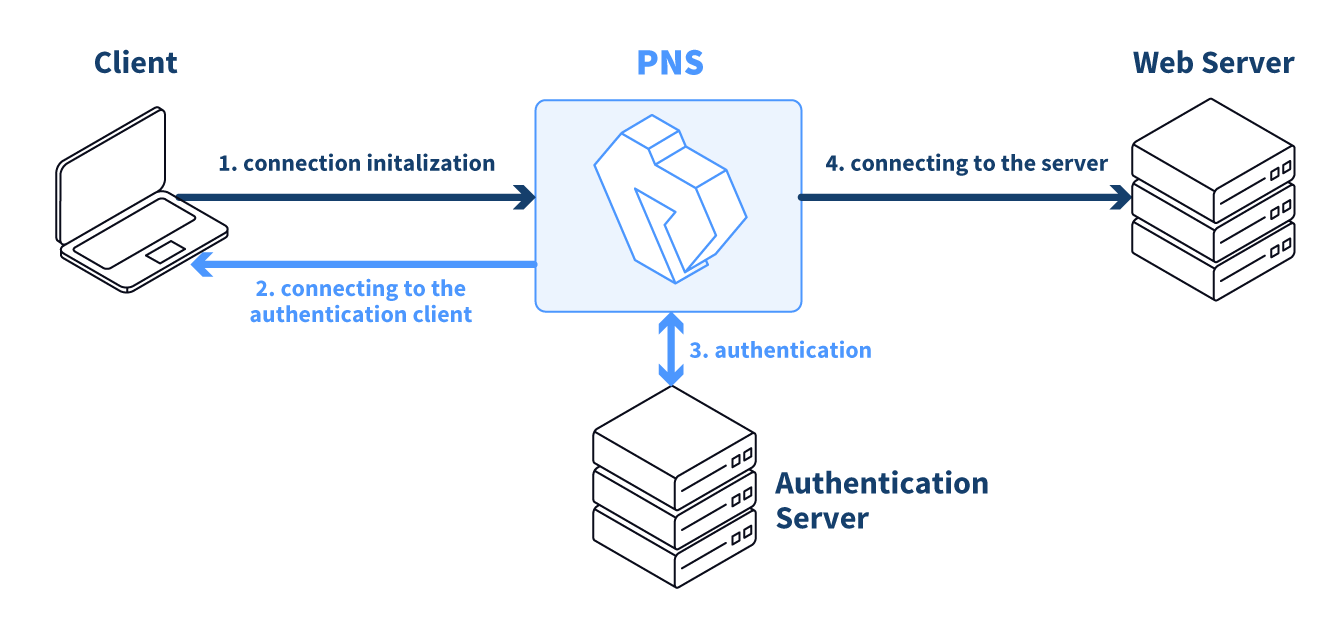
Steps:
The client initiates a connection towards the server.
PNS determines the service to be accessed based on the IP address of the client and the server. If authentication is required for the connection (an authentication policy is assigned to the service), PNS initiates a connection towards the client using the Authentication Agent protocol.
Depending on the authentication methods available (for example, for password-based authentication), the dialog of the Authentication Agent is displayed on the client machine. The user enters the username that the Authentication Agent forwards to PNS.
The PNS firewall connects to Authentication Server (AS) and retrieves the list of authentication methods enabled for the particular user. Multiple authentication methods can be enabled for a single user (for example, x509, Kerberos, password, and so on). The authorization of the user is also performed in this step, for example, the verification of the LDAP group membership.
PNS returns the list of available methods to the client. The user selects a method and provides the information (for example, the password) required for the method.
The Authentication Agent sends the data (for example, the password) to PNS that forwards it to AS.
AS performs the authentication and notifies PNS about the result (success/failure).
PNS returns the result to the client and — if the authentication was successful, builds a connection towards the server. In case of a failed authentication it terminates the connection to the client.
This section describes the installation and configuration of the Authentication Agent on Microsoft Windows and GNU/Linux platforms. The Authentication Agent has to be installed on every computer having access to authenticated services.
The agent has two components:
Authentication Agent Multiplexer: It is a daemon running in the background, accepting the connections coming from PNS and verifying the TLS certificates of PNS (if the communication is encrypted). In a multi-user environment the Multiplexer displays the dialog of the Authentication Agent on the desktop of the user initiating a connection requiring authentication.
Authentication Agent: This application collects the information required for the authentication, for example, the username, authentication method, password, and so on.
The following platforms are supported:
Windows 10 LTSB (Long-Term Servicing Branch)
Windows Server 2016, 2019
Ubuntu 24.04 LTS
AA is distributed as a portable AppImage package on GNU/Linux platforms without needing superuser permissions to install the application.
3.1.1. Procedure – Installing the Authentication Agent on Microsoft Windows
Purpose:
The Authentication Agent (AA) installer is located in the \platforms\windows\ folder of the PNS CD-ROM, its latest version is also available from the Balasys website.
The installer is available as Windows Installer Package (.msi)
Steps:
-
Place the PNS CD-ROM into the CD drive and start the
authentication-agent-<version>.msifile located in the\platforms\windows\folder.Warning Administrator privileges are required to install the application.
-
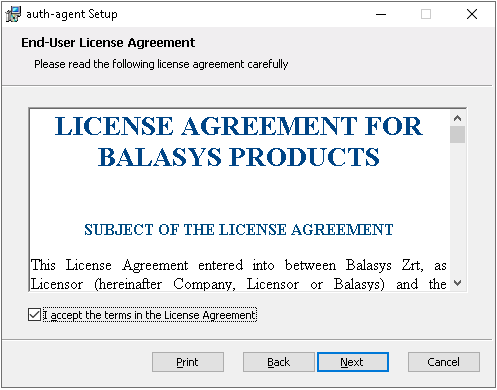
Check to accept the End-User License Agreement, which is displayed after the installer starts. Click to continue installation process. To cancel the installation at any time during the process, click .
-
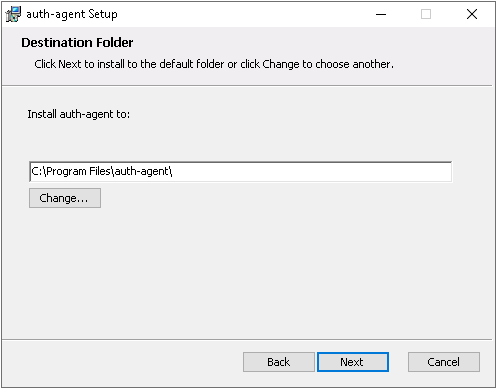
Select the destination folder for the application and click to continue. The default folder is
C:\Program Files\auth-agent.
-
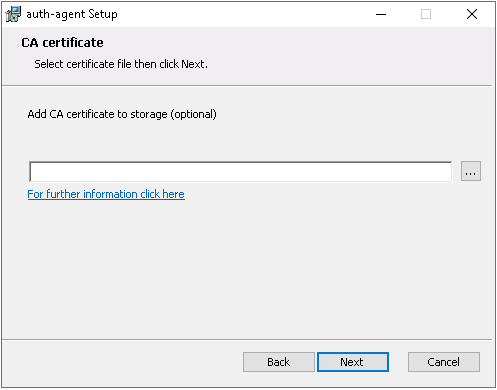
Optional step: Click button, select the CA certificate to import, then click to import the CA certificate.
Note For authentication purposes, when PNS communicates with AA, AA expects TLS-encrypted communication. For details, see section Section 4.1.1, Registry entries on Microsoft Windows platforms and section Section 4.1, Configuring Authentication Agent on Microsoft Windows platforms.
If the Authentication Agent and PNS communicate through a TLS-encrypted channel (recommended), the certificate of the Certificate Authority (CA) signing the certificates of the PNS firewalls can be imported to the Authentication Agent Multiplexer's certificate store.
Note The CA certificate has to be in
DERorPEMformat. (with typical file extensions of *.der, *.pem, *.crt, *.cert) It is not necessary to import the certificate during the installation, it can also be done later. For details about encrypting the agent-PNS authentication, see Section 4.1.3, Configuring TLS connections on Microsoft Windows platforms.
-
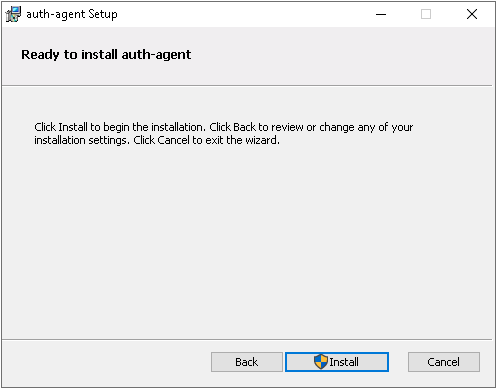
Click to start the installation process. The installer copies the required files and registers the service called , which is started after the registration.
After the installer has completed the above steps, click .
The Authentication Agent (AA) logo is displayed on the system tray, indicating that the application is running. It is also started automatically after each Windows startup.
3.1.2. Procedure – Installing Authentication Agent with Group Policy Object (GPO) deployment
Prerequisites:
Create the necessary certificates as instructed in section Procedure 11.3.8.2, Creating certificates in Proxedo Network Security Suite 2 Administrator Guide.
Set the parameters for the AS certificate.
Export the CA certificate signed by AS in
DERformat for the Windows client.
Steps:
Download the .msi installer. The browser application or the Windows Defender Cloud might send a notification or a warning due to the new and unknown installer program, this can be disregarded.
Install the Windows Client and import the CA certificate during the installation. Reboot the system, if it is necessary.
Define the preferences with the help of the GUI or via the registry.
Test the expected behaviour by initiating traffic.
-
Export the following registries:
-
Export the
HKEY_CURRENT_USER\Software\Balasys\AuthAgentregistry to the hlcuaa.reg file, which contains the user settings for AA. The result shall be as follows:Windows Registry Editor Version 5.00 [HKEY_CURRENT_USER\Software\Balasys] [HKEY_CURRENT_USER\Software\Balasys\AuthAgent] "HasPreferences"=dword:00000000 "TLS"=dword:00000001 "Automatic"=dword:00000001 "Details"=dword:00000000 "CanRemember"=dword:00000001 "ForgetPassword"=dword:00000000 "ForgetPasswordInterval"=dword:00000001
-
Export the
HKEY_LOCAL_MACHINE\SOFTWARE\Balasys\AuthAgent, which contains the AA Multiplexer settings, into the hklmaa.reg file. The result shall be as follows:Windows Registry Editor Version 5.00 [HKEY_LOCAL_MACHINE\SOFTWARE\Balasys] [HKEY_LOCAL_MACHINE\SOFTWARE\Balasys\AuthAgent] "InstallLang"="1033"
The service private certificate store, used by the AA Multiplexer, can also be deployed as a registry key.
-
Export the
HKEY_LOCAL_MACHINE\SOFTWARE\Microsoft\
            Cryptography\Services\auth-agent-mpxd
registry to the hklmaacert.reg file. The result shall be as follows:Windows Registry Editor Version 5.00 [HKEY_LOCAL_MACHINE\SOFTWARE\Microsoft\Cryptography\Services\auth-agent-mpxd] [HKEY_LOCAL_MACHINE\SOFTWARE\Microsoft\Cryptography\Services\auth-agent-mpxd\ SystemCertificates] [HKEY_LOCAL_MACHINE\SOFTWARE\Microsoft\Cryptography\Services\auth-agent-mpxd\ SystemCertificates\My] [HKEY_LOCAL_MACHINE\SOFTWARE\Microsoft\Cryptography\Services\auth-agent-mpxd\ SystemCertificates\My\Certificates] [HKEY_LOCAL_MACHINE\SOFTWARE\Microsoft\Cryptography\Services\auth-agent-mpxd\ SystemCertificates\MY\Certificates\6421DCB8501C2E1F15DB8BD3A94F435C01DB7CD3] "Blob"=hex:03,00,00,00,01,00,00,00,14,00,00,00,64,21,dc,b8,50,1c,2e,1f,15,db,\ ... ... ... ... ... 64,0a,87,e9,45,99,04,9e,28,cb,c0,6c,2a,e5,c7,cb,ce,29,d8,b1,e1
Note Note that there can be several empty paths created by the system automatically, which can be included safely.
For further details on registries, see Section 4.1.1, Registry entries on Microsoft Windows platforms.
As a result, there will be four registries exported.
-
Switch to the GPO administrator system and download the AA
msi flavorinstaller and place it in the Windows share where the other remotely installled applications are stored.Continue with the procedures detailed in section Procedure 4.1.5, Configuring Group Policy Object (GPO) deployment
3.2. Procedure – Using AA on GNU/Linux platforms
Purpose:
To run AA on a GNU/Linux system, complete the following steps.
Steps:
-
Make the AppImage file executable:
In the terminal, enter the following command: chmod a+x authentication-agent-2.0.0-x86_64.AppImage.
-
Run the AppImage file:
In the terminal, enter the following command: ./authentication-agent-2.0.0-x86_64.AppImage.
Some settings of Authentication Agent (AA) can be modified through the Windows Registry. Launch the registry editor by issuing the regedit command (either from a command prompt or through the button).
In the Registry Editor, the Authentication Agent parameters are located under: HKEY_LOCAL_MACHINE\SOFTWARE\Balasys\AuthAgent for the Multiplexer and HKEY_CURRENT_USER\Software\Balasys\AuthAgent for the Client application.
The component has to be restarted if a value is modified (that is, the service for Authentication Agent Multiplexer, the Authentication Client application for Authentication Agent).
To restart the Authentication Agent Multiplexer, select the button, type and then press . Select on the list, then it.
The following settings are available from the registry:
The following table presents the available settings from the registry for the Client application. (These setting may not exists by default, and should be created to override default behaviour)
|
Name |
Description |
Default value |
|---|---|---|
|
Automatic |
To enable the automatic Kerberos authentication without user interaction with the Authentication Agent, set it to |
0 |
|
CanRemember |
To save your credentials so that the client will fill the username and password automatically for later authentication attempts, set this parameter to |
1 |
|
Details |
The Authentication Agent displays the details of the connection in the popup dialog if this parameter is set to |
0 |
|
ForgetPassword |
To enable password expiration defined by ForgetPassword interval, set this value to 1. Default value of 0 disables password expiration. |
0 |
|
ForgetPasswordInterval |
To prevent unauthorized initiation of network connections through unattended machines, configure this parameter. Enter the number of minutes after which Authentication Agent deletes the stored password and requires authentication for new connection requests. |
1 |
|
HasPreferences |
To enable the menu item in the system tray icon of Authentication Agent, set this parameter to |
1 |
|
LogClient |
It marks the verbosity level of the authentication client, ranging from The log file is stored in the user's home directory. |
0 |
Table 4.1. Registry setting options for the Client application
The following table presents the available settings from the registry for the Multiplexer.
|
Name |
Description |
Default value |
|---|---|---|
|
AliasFile |
This is the name and path (for example, |
|
|
Log |
It is the verbosity level of the Authentication Agent Multiplexer, ranging from The log file is stored in the |
0 |
|
TLS |
To configure the Authentication Agent Multiplexer so that it uses only TLS-encrypted connections, set this parameter to |
1 |
|
VerifyDepth |
It is the maximum length of the verification chain. |
3 |
Table 4.2. Registry setting options for the Multiplexer
To display the version number of the client, enter auth-agent-client.exe --version.
The Authentication Agent Multiplexer (auth-agent-mpxd.exe) has the following command line options:
- --install_service
It registers the Authentication Agent service.
- --remove_service
It removes the Authentication Agent service.
- --start_service
It starts the Authentication Agent service.
- --stop_service
It stops the Authentication Agent service.
Authentication Agent Multiplexer and PNS can communicate through an TLS-encrypted channel. For this, a certificate has to be available on the PNS firewall that PNS uses to authenticate the connection to the Authentication Agent Multiplexer. The Authentication Agent Multiplexer verifies this certificate using the certificate of the CA issuing PNS's certificate, therefore the certificate of the CA has to be imported to the machine running the Authentication Agent.
| Note |
|---|
During authentication, when PNS communicates with AA, AA expects TLS-encrypted communication. In order to disable this and to use the communication without encryption (which is strongly against the recommendation, but useful for debugging purposes), the TLS encryption shall be disabled by setting the TLS registry key to value '0'. For details on this parameter, see Section 4.1, Configuring Authentication Agent on Microsoft Windows platforms. Also see, Procedure 3.1.1, Installing the Authentication Agent on Microsoft Windows. |
| Note |
|---|
It is highly recommended to encrypt the communication between PNS and the Authentication Agent, because without it, anyone can connect to the Authentication Agent Multiplexer, resulting in the authentication information obtained by unauthorized people. It is essential to use encryption when password authentication is used. For details on encryption, see Procedure 3.1.1, Installing the Authentication Agent on Microsoft Windows. |
4.1.3.1. Procedure – Encrypting the communication between PNS and the Authentication Agent on Microsoft Windows platforms
Purpose:
To enable encryption between PNS and the Authentication Agent, complete the following steps. For the steps to be completed from Management Console (MC), see Chapter 11, Key and certificate management in PNS in Proxedo Network Security Suite 2 Administrator Guide.
Steps:
Create a CA (for example,
AA_CA) using the Management Console (MC). This CA will be used to sign the certificates shown by the PNS firewalls to the Authentication Agents.Export the CA certificate into
DERformat.-
Generate certificate request(s) for the PNS firewall(s) and sign it with the CA created in Step 1.
Note Each firewall shall have its own certificate. Do not forget to set the firewall as the Owner host of the certificate.
Distribute the certificates to the firewalls.
-
Install the Authentication Agent (AA) application to the workstations and import to each machine the CA certificate exported in Step 2.
There are three ways to import the CA certificate:
Import the CA certificate by using the installer of the Authentication Agent.
Import the CA certificate manually by using the addcert and getcert programs (see Procedure 4.1.3.2, Importing the CA certificate manually).
You can also import the CA certificate by using the Microsoft Management Console (see Procedure 4.1.3.3, Importing the CA certificate using Microsoft Management Console (MMC)).
Create the appropriate outband authentication policies in MC and reference them among the services of PNS. See Chapter 15, Connection authentication and authorization in Proxedo Network Security Suite 2 Administrator Guide for details.
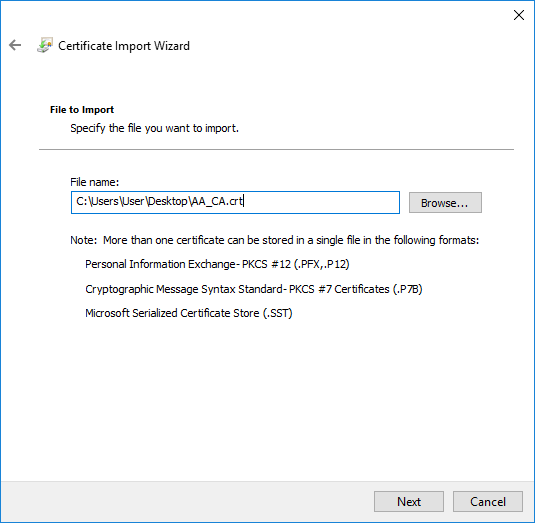
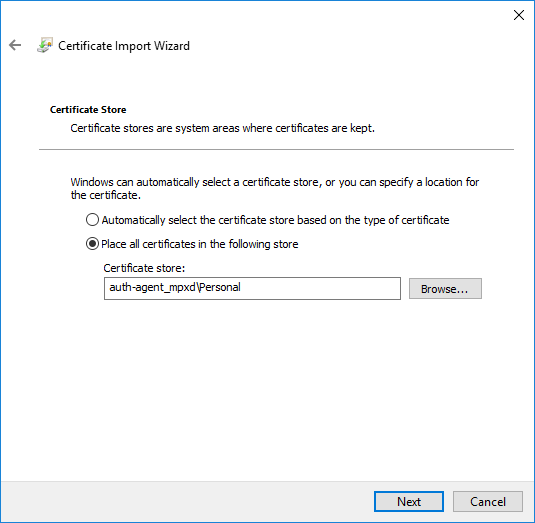
4.1.3.2. Procedure – Importing the CA certificate manually
Procedure:
To import the certificate of the CA using the addcert and getcert programs, complete the following steps.
Steps:
-
The certificate can be imported using the
addcert.exeprogram located in the installation folder of the Authentication Agent (C:\Program Files\auth-agentby default). The program can be started from a command prompt. Provide the name and the path of theDER-formatted certificate as an input parameter, for example:C:\Program Files\auth-agent\bin\addcert.exe C:\temp\AuthenticationAgent_CA.crt
Note Running
addcert.exerequires administrator privileges. Verify that the certificate has been successfully imported by running getcert.exe. Running getcert.exe lists the Subject of all imported certificates.
Restart the service.
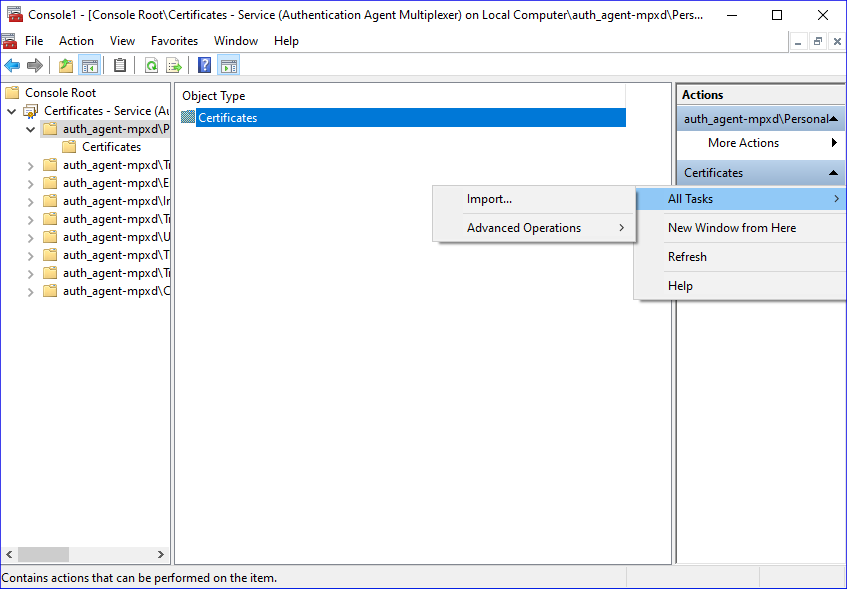
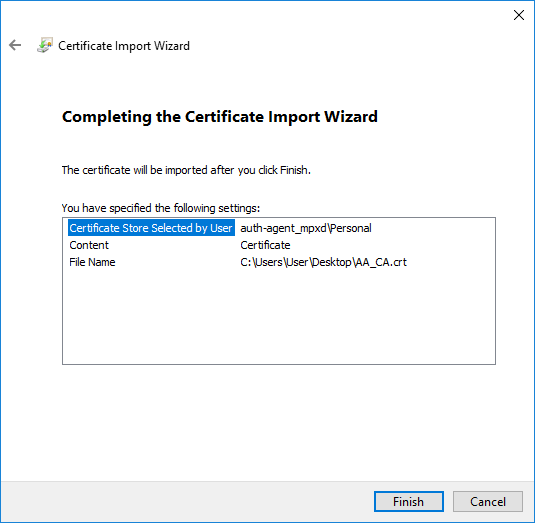
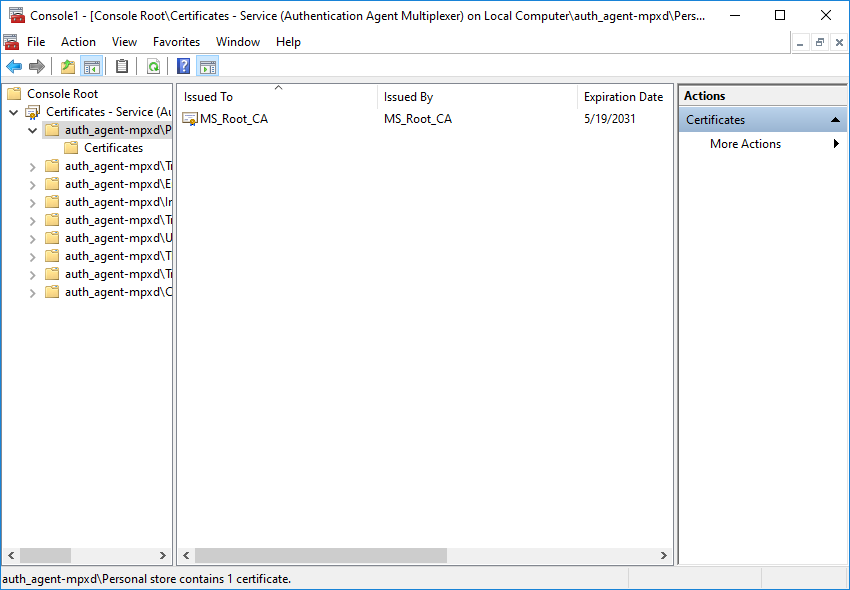
4.1.3.3. Procedure – Importing the CA certificate using Microsoft Management Console (MMC)
Purpose:
To import the certificate of the CA complete the following steps.
Steps:
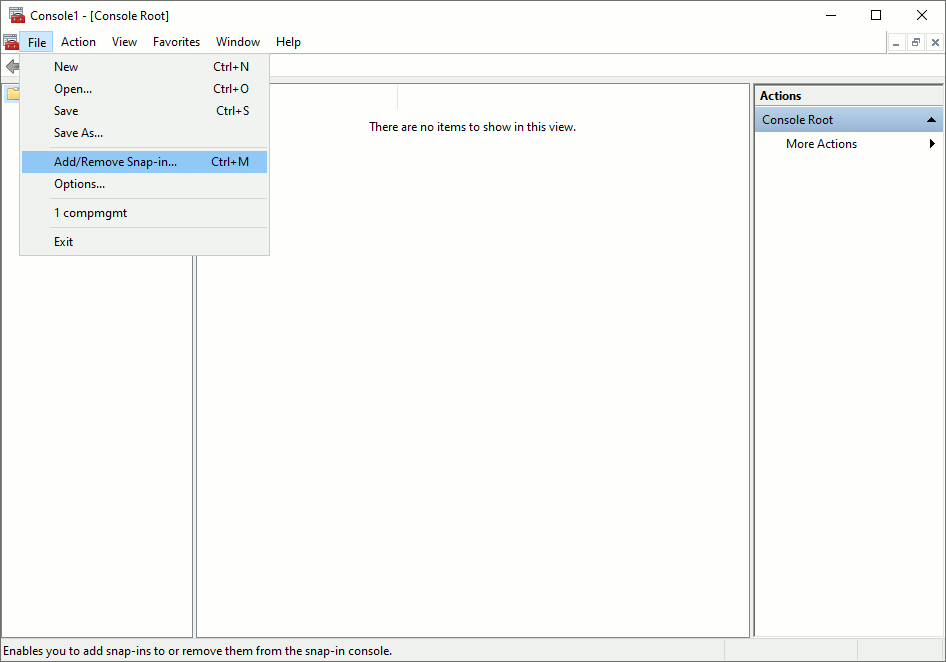
-
Start Microsoft Management Console by executing
mmc.exeafter selecting the button.Note Running
mmc.exerequires administrator privileges. -
Select , from the menu.
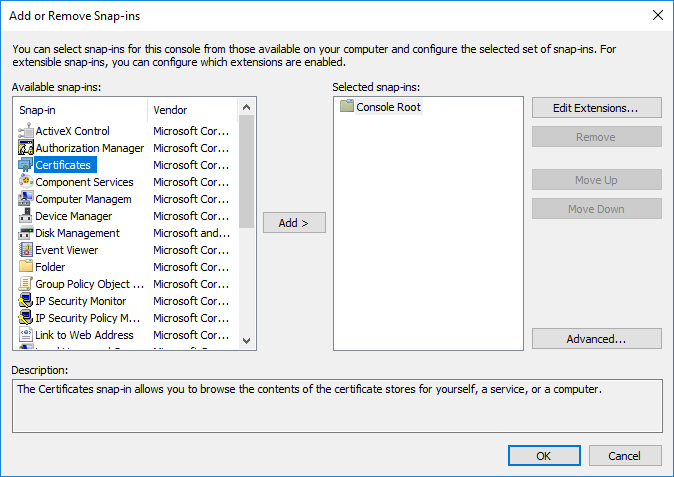
-
Select and click from the list.
-
Select and click .
-
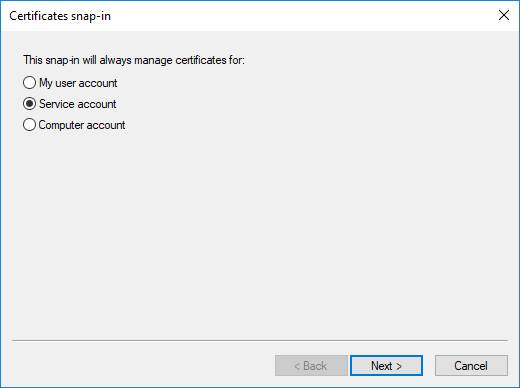
Select and click .
-
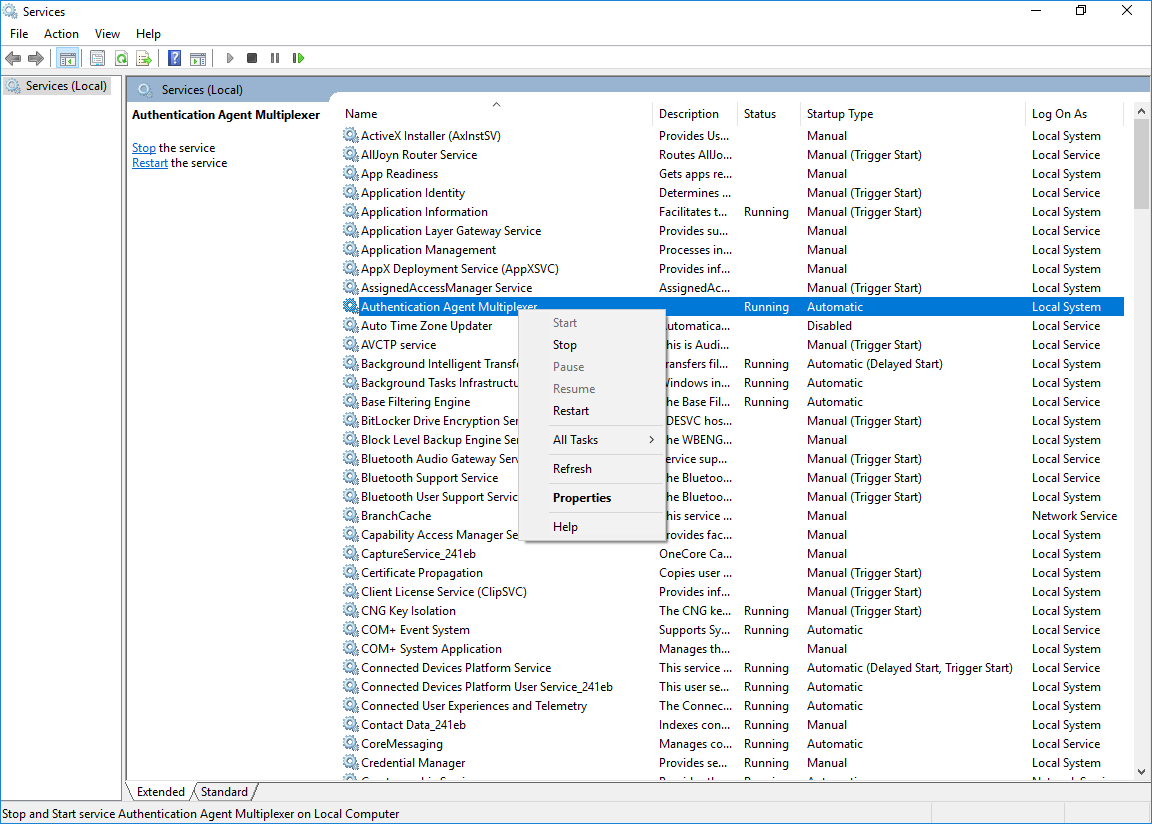
Select the service and click .
With the above steps a snap-in module has been configured that enables to conveniently manage the certificates related to the Authentication Agent Multiplexer.
-
Navigate to , and click .
Right-click , navigate to . The is displayed. Click .
-
Select the certificate to import and click .
-
Click , when Windows offers a suitable certificate store by default.
-
Click on the summary window and on the window that marks the successful import of the certificate.
The main window of MMC is displayed with the imported certificate.
-
Restart the Authentication Agent service. Scroll to the Authentication Agent Multiplexer among the list of Services and right-click on it. Navigate to > .
It is also possible to start and stop the Authentication Agent here.


4.1.4. Procedure – Configuring X.509 certificate based authentication on Microsoft Windows platforms
Purpose:
For authentication based on X.509 certificates the certificate and the private key of the user has to be deployed onto the workstation. Import the certificate of the user into their personal certificate store. This can be accomplished most easily through the Control Panel item.:
Steps:
Click the button and type then press .
Navigate to > > .
-
Right-click and navigate to .
The is displayed.
Note Hardware keys and tokens having a suitable driver for Windows are also displayed in this store and can be used from the Authentication Agent.
Import the certificate, using the tool.
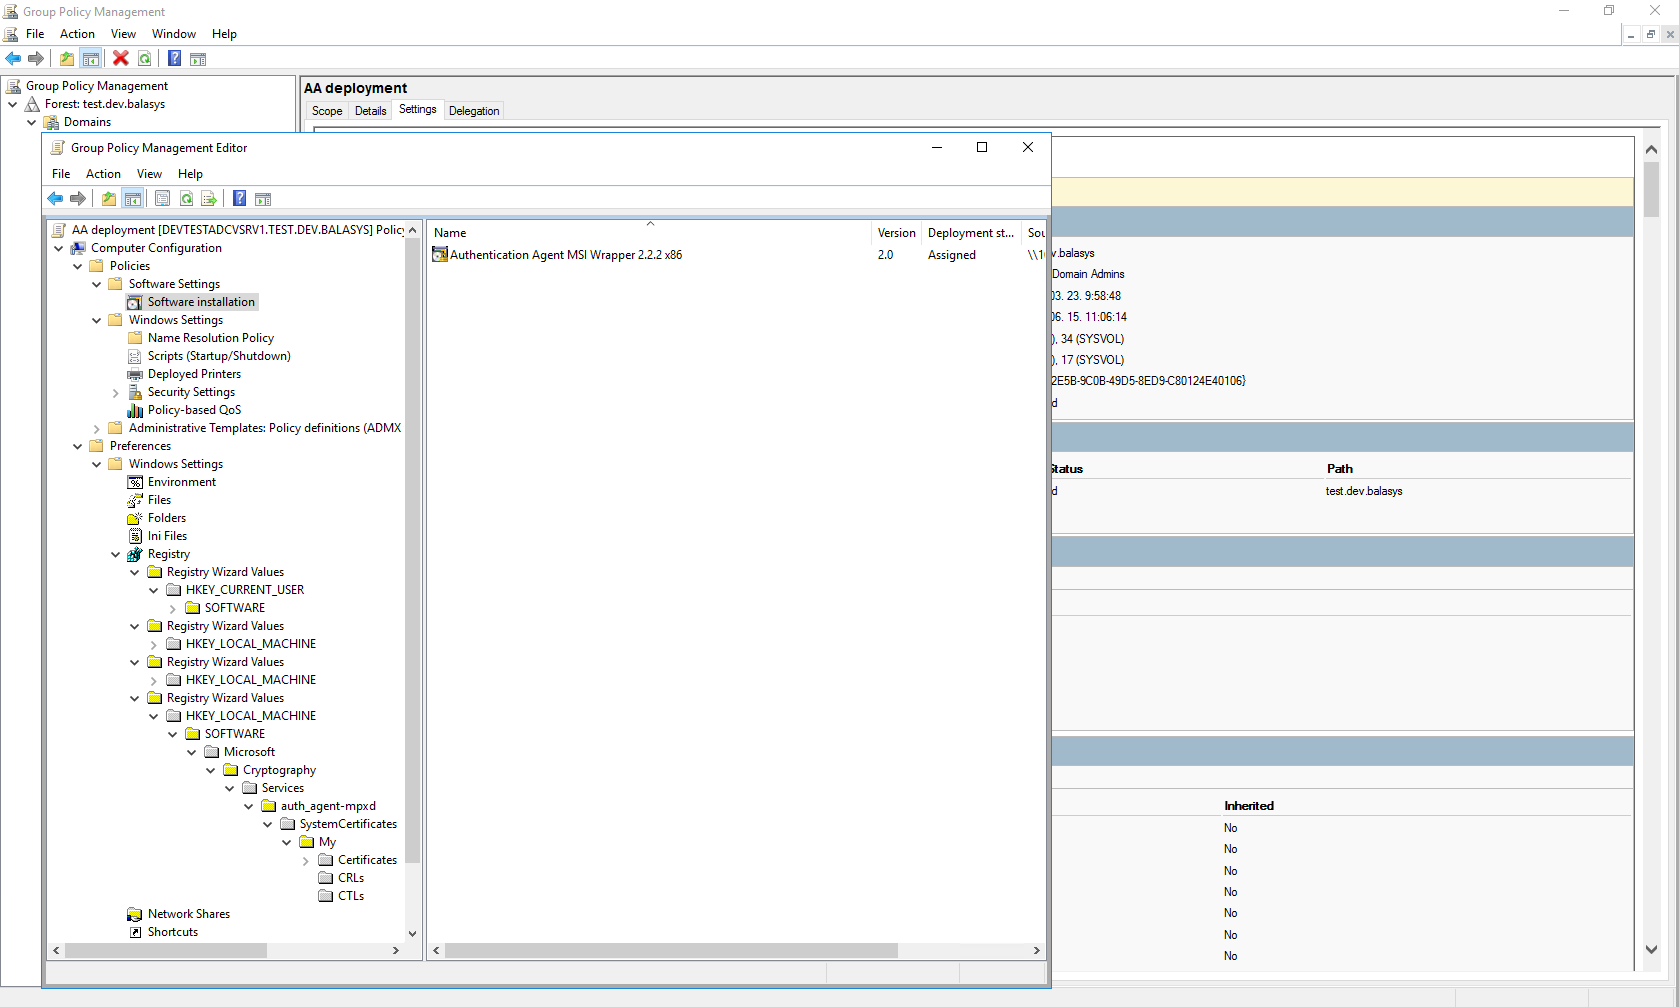
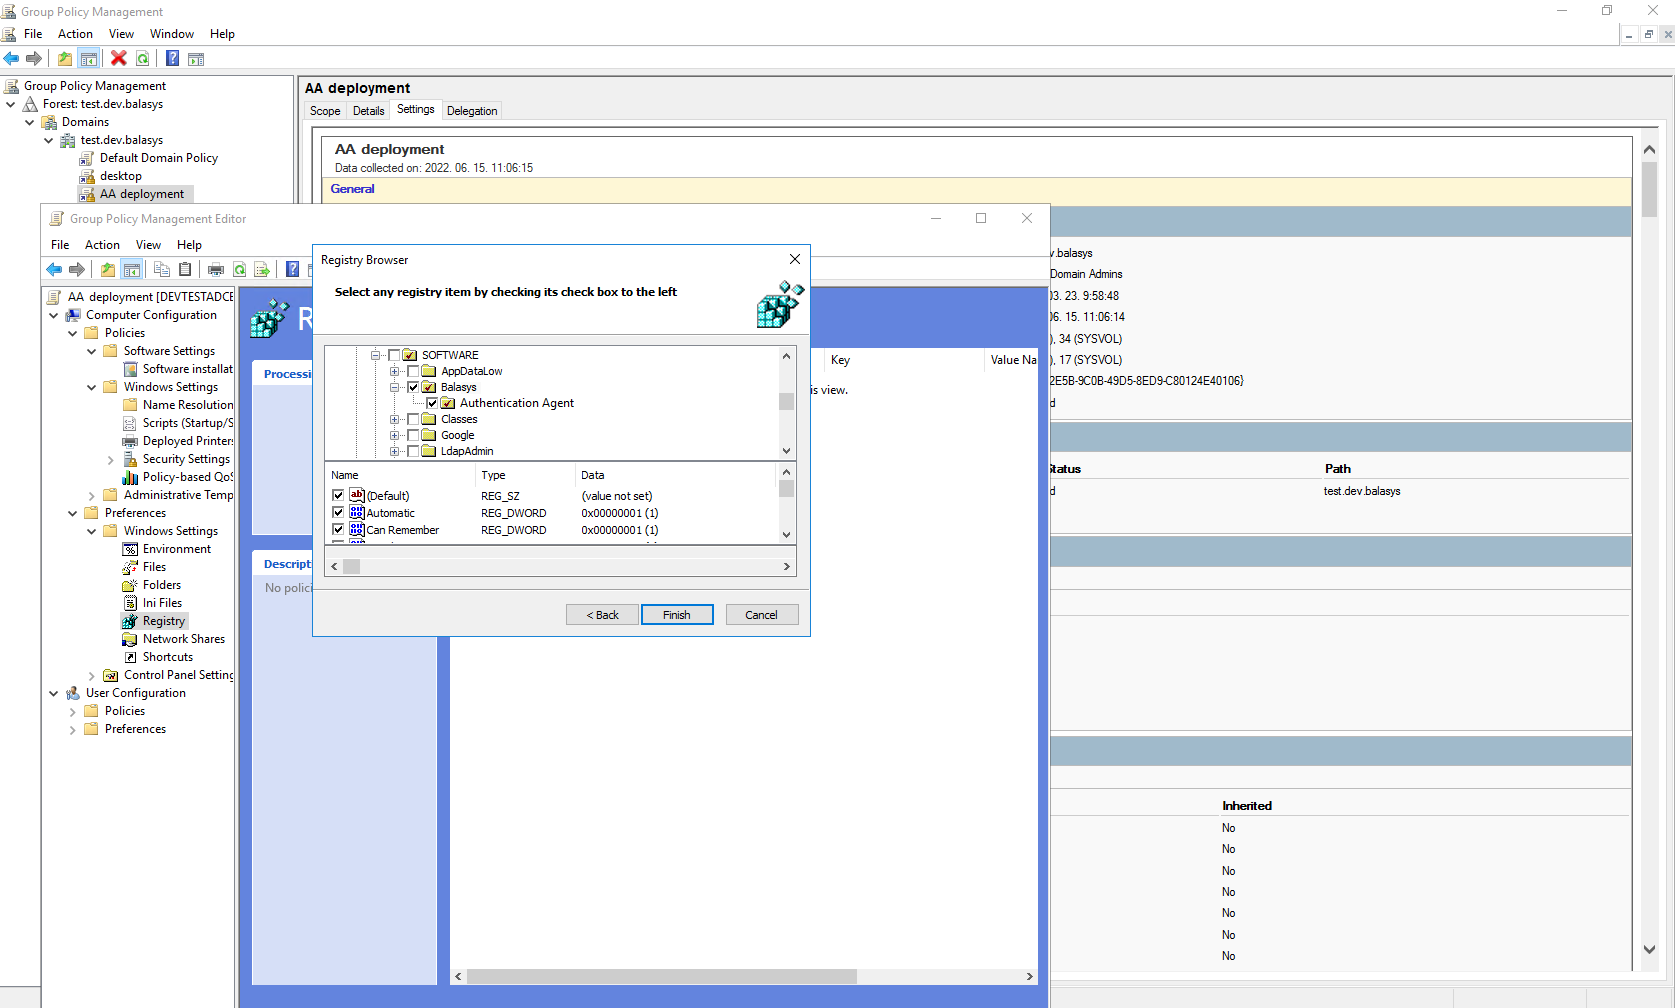
4.1.5. Procedure – Configuring Group Policy Object (GPO) deployment
Import all four registry files to the GPO configurator system, so that the Registry Wizard can browse them. Later, remove the registry information if it is no longer required. If it is not possible to remove them, all four files have to be configured as registry keys.
Create a new policy to the corresponding forest as AA deployment.
Configure the corresponding parameters, as, for example, target scope or filetring and so on.
Edit the AA Deployment policy.
Add the AA msi installer as a new package under the path.
-
Browse the network share for the newly added package, select it, and set it to Auto installation.
-
Import all four registry settings with the help of the Registry Wizard. The HKLM registries under the path, and the HKCU registries under the path.
Close the GP editor.
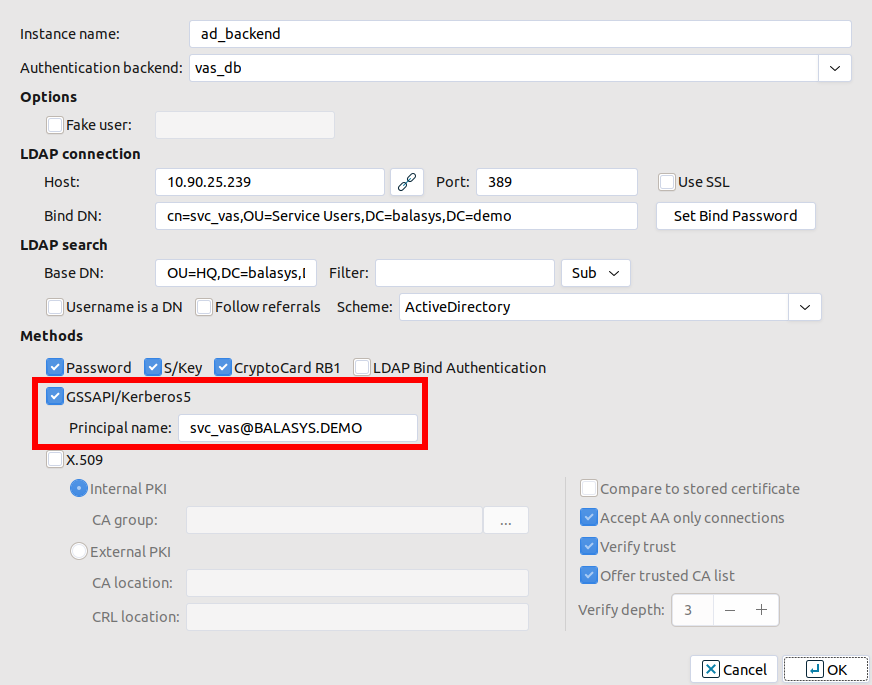
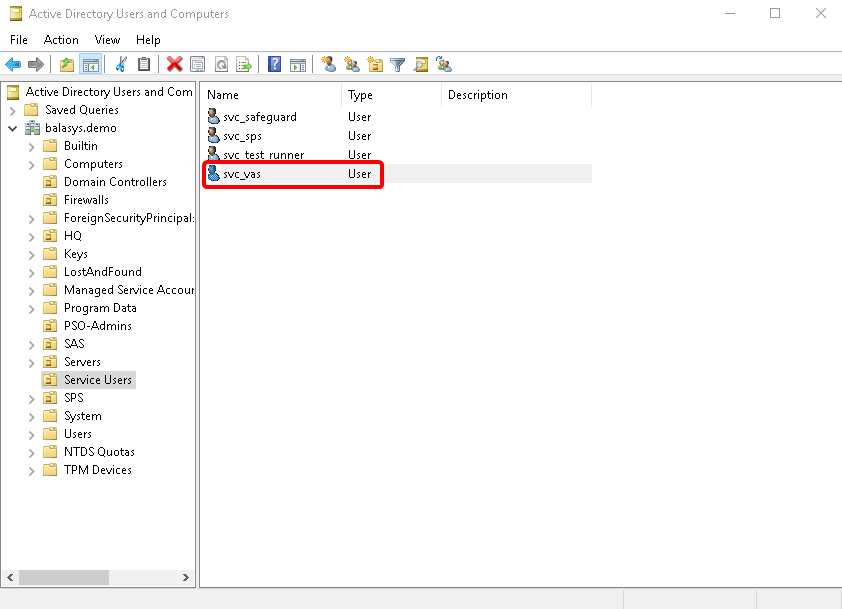
4.1.6. Procedure – Enabling Kerberos authentication in AS
Complete the following steps to enable Kerberos authentication in Authentication Server using Windows Active Directory (AD) environment.
Steps:
In MC select .
-
Select the checkbox at section and provide the realm at field.
-
Create the domain user in the . Use the provided in the previous step.
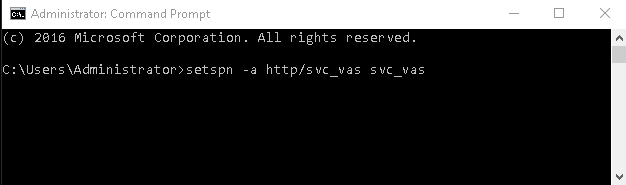
Start the Command Prompt in the Domain Controller with Administrator privileges.
-
Run the following command:
setspn -a http/ <username> <username>
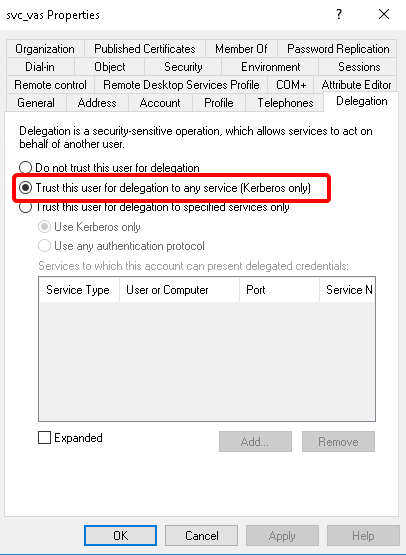
In the window, select the user created in Step 3. and open the user’s .
-
A new tab is available now. Select the option. Click .
-
Switch to the tab in the menu item. Select the option and click to apply the setting.
-
Install the Kerberos packages on the required server, for example on Authentication Agent.
#:apt-get install krb5-user
Provide the FQDN of the default realm during the installation process.
-
Test Kerberos with the following commands. In the example the FQDN is BALASYS.DEMO.
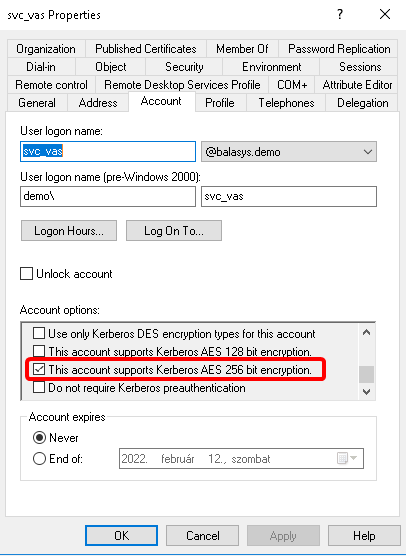
#:kinit svc_vas@BALASYS.DEMO
#:klist -e
#:kdestroy
-
Set Kerberos with the following commands:
#:ktutil
ktutil:addent -password -p svc_vas@BALASYS.DEMO -k 1 -e aes256-cts-hmac-sha1-96
ktutil:addent -password -p svc_vas@BALASYS.DEMO -k 2 -e aes256-cts-hmac-sha1-96
ktutil:addent -password -p svc_vas@BALASYS.DEMO -k 3 -e aes256-cts-hmac-sha1-96
ktutil:addent -password -p svc_vas@BALASYS.DEMO -k 4 -e aes256-cts-hmac-sha1-96
ktutil:addent -password -p svc_vas@BALASYS.DEMO -k 5 -e aes256-cts-hmac-sha1-96
ktutil:addent -password -p svc_vas@BALASYS.DEMO -k 6 -e aes256-cts-hmac-sha1-96
ktutil:wkt /etc/krb5.keytab
ktutil:exit
#:chown vas /etc/krb5.keytab
The graphical client (auth-agent-gtk) has the following command line parameters:
- --help or -?
It displays a brief help message.
- --version or -V
It displays version number and compilation information.
- --automatic or -a
It enables automatic Kerberos authentication.
- --no-syslog or -l
It sends log messages to the standard output instead of syslog.
- --verbose <verbosity> or -v <verbosity>
It sets verbosity level to <verbosity>. The default verbosity level is
3; the possible values are0-10.- --logtags; or -T
It prepends log category and log level to each message.
Authentication Agent Multiplexer (auth-agent-mpxd) has the following command line parameters:
- --help or -?
It displays a brief help message.
- --version or -V
It displays the version number of auth-agent-mpxd.
- --no-syslog or -l
It sends log messages to the standard output instead of syslog.
- --verbose <verbosity> or -v <verbosity>
It sets verbosity level to <verbosity>. The default verbosity level is
3; possible values are0-10.- --logtags; or -T
It prepends log category and log level to each message.
- --aliasfile; or -a
It is the name (including full path) of a text file (for example,
/tmp/aliases) used by Authentication Agent Multiplexer to redirect the authentication requests of certain users to a different user in multiuser environments. For example, to redirect all authentication request of therootuser toMainUseradd the following line to the file:root: MainUser.- --log-spec; or -s
It sets verbosity mask on a per category basis. Each log message has an assigned multi-level category, where levels are separated by a dot. For example, HTTP requests are logged under http.request. The <spec> is a comma-separated list of log specifications. A single log specification consists of a wildcard matching log category, a colon, and a number specifying the verbosity level of that given category. The categories match from left to right, for example, --logspec 'http.*:5,core:3'. The last matching entry will be used as the verbosity of the given category. If no match is found the default verbosity specified with --verbose is used.
- --no-require-tls; or -S
It turns off the TLS encryption of the communication between PNS and the Multiplexer.
- --bind-address; or -b and, --bind-port; or -p
It is the IP address and the port, the Multiplexer is accepting connections on.
- --crt-dir; or -t
It is the path of the directory containing the certificate of the CA that issued the certificate of the PNS firewall.
- --crl-dir; or -r
It is the path of the directory containing the Certificate Revocation List (CRL) related to the above CA.
To enable encryption between PNS and the Authentication Agent complete the following steps. For the steps to be completed from MC, see Chapter 11, Key and certificate management in PNS in Proxedo Network Security Suite 2 Administrator Guide.
| Note |
|---|
During authentication, when PNS communicates with AA, AA expects TLS-encrypted communication. In order to disable this and to use the communication without encryption (which is strongly against the recommendation, but useful for debugging purposes), the TLS encryption shall be disabled by setting the --no-require-tls; or -S command line parameter. |
4.2.2.1. Procedure – Encrypting the communication between PNS and the Authentication Agent on GNU/Linux platforms
Steps:
Create a CA (for example,
AA_CA) using the Management Console (MC). This CA will be used to sign the certificates shown by the PNS firewalls to the Authentication Agents.Export the CA certificate into
PEMformat.-
Generate certificate request(s) for the PNS firewall(s) and sign it with the CA created in Step 1.
Note Each firewall shall have its own certificate. Do not forget to set the firewall as the Owner host of the certificate.
Distribute the certificates to the firewalls.
-
Install the Authentication Agent (AA) application to the workstations and import to each machine the CA certificate exported in Step 2.
To import the CA certificate complete the following steps:
-
Create the
/etc/auth-agent/cadirectory:mkdir /etc/auth-agent/ca
Copy the certificate exported into
PEMformat in Step 2 into the/etc/auth-agent/cadirectory.-
Create symlinks to the certificate files:
c_rehash .
-
Restart the :
systemctl restart auth-agent-mpxd.service
The authentication client is now ready to accept encrypted connections from PNS.
-
Create the appropriate outband authentication policies in MC and reference them among the services of PNS. For details, see Chapter 15, Connection authentication and authorization in Proxedo Network Security Suite 2 Administrator Guide.
For authentication based on X.509 certificates the certificate and the private key of the user has to be deployed onto the workstation. Create a directory called .auth-agent in the home folder of the user and copy the certificate and private key of the user in PEM format into this directory. Use the cert.pem and key.pem filenames, or create symlinks with these names pointing to the certificate and the key file. The Authentication Agent will automatically use the certificate found in this directory.
Purpose:
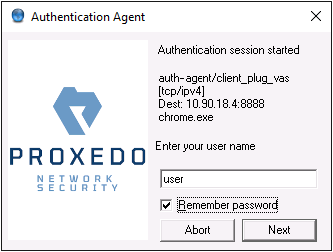
When the user launches an application that requires authentication (for example, a web browser, e-mail client, and so on) the PNS firewall automatically displays the authentication client on the user's screen.
The client displays the name of the service requiring authentication (intra_http in the above example), and — provided that the administrator enabled it — further details of the connection (for example, destination IP address).
Steps:
-
To save your credentials so that the client will fill in the username and password automatically for later authentication attempts, select . For details on configuring password storage period length and deleting a previously saved password, see Procedure 6., .
To cancel the authentication at any time, click .
-
Enter your user name in the field and click .
-
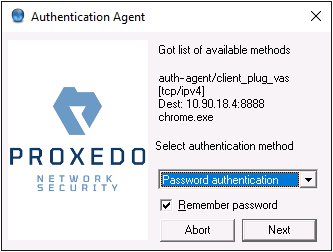
Select the authentication method to use from the list. The list displays only the methods that are available for this user.
To authenticate with a password, select .
-
To use Kerberos authentication, select .
Note When using Kerberos authentication the authentication client is not displayed if you have configured in . For details, see Procedure 6., .
To authenticate with an X.509 certificate, select .
-
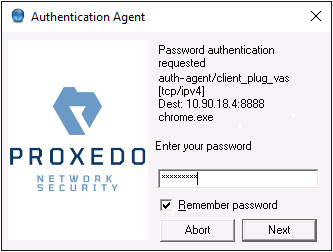
Provide the information required for the selected authentication method. For example, for , enter your password.
Note After successful authentication, the window of the authentication client is closed automatically, and the connection to the target server is established. If the authentication fails, the client displays an error message.
Purpose:
Authentication Agent is launched on desktop environment startup, and places its icon on the system tray. To configure Authentication Agent preferences, complete the following steps.
| Note |
|---|
To display the version number and other information about Authentication Agent, right-click the system tray icon and click . |
Steps:
-
Right-click the system tray icon and click .
To enable automatic Kerberos authentication without user interaction with the Authentication Agent, select . In this case, Authentication Agent will use the username provided during Windows or GNU/Linux desktop session login.
To prevent unauthorized initiation of network connections through unattended machines, configure . Enter the number of minutes after which Authentication Agent deletes the stored password and requires authentication for new connection requests.
-
To immediately delete the stored password from the Authentication Agent and require authentication for new connection requests, click .
AA stores its preferences in the ~/.config/aa/aa.cfg configuration file on GNU/Linux, and in the Windows Registry on Microsoft Windows platforms, for more information see Section 4.1.1, Registry entries on Microsoft Windows platforms.
