Copyright © 1996-2020 BalaSys IT Ltd.
This documentation and the product it describes are considered protected by copyright according to the applicable laws.
This product includes software developed by the OpenSSL Project for use in the OpenSSL Toolkit (http://www.openssl.org/). This product includes cryptographic software written by Eric Young (eay@cryptsoft.com)
Linux™ is a registered trademark of Linus Torvalds.
Windows™ 10 is registered trademarks of Microsoft Corporation.
All other product names mentioned herein are the trademarks of their respective owners.
DISCLAIMER
is not responsible for any third-party websites mentioned in this document. does not endorse and is not responsible or liable for any content, advertising, products, or other material on or available from such sites or resources. will not be responsible or liable for any damage or loss caused or alleged to be caused by or in connection with use of or reliance on any such content, goods, or services that are available on or through any such sites or resources.
June 04, 2020
Abstract
This document describes how to install and configure the Authentication Agent
Table of Contents
Developed by , Authentication Agent (AA) is an authentication client, capable of cooperating with the PNS firewall and the Authentication Server (AS) to identify the users initiating network connections. Authentication Agent enables the complete network traffic to be audited on the user level.
Authentication Agent (AA) is an authentication client, capable of cooperating with the PNS firewall and the Authentication Server (AS) to identify the users initiating network connections. The authentication process and the related communication between the components is summarized below. For details, see Chapter 15, Connection authentication and authorization in Proxedo Network Security Suite 1.0 Administrator Guide.
Authentication aims to determine the identity of the user. During the authentication process the user initiating the connection shares a secret (for example, a password) with the other party that verifies its authenticity.
Several procedures (so called authentication methods) exist for verifying the identity of the user:
The user knows a secret, for example, a password, PIN code, the response to a challenge, and so on.
The user owns a device, for example, a hardware key, chipcard, SecurID token, and so on.
Naturally, the above methods can be combined to implement strong two-factor authentication in sensitive environments.
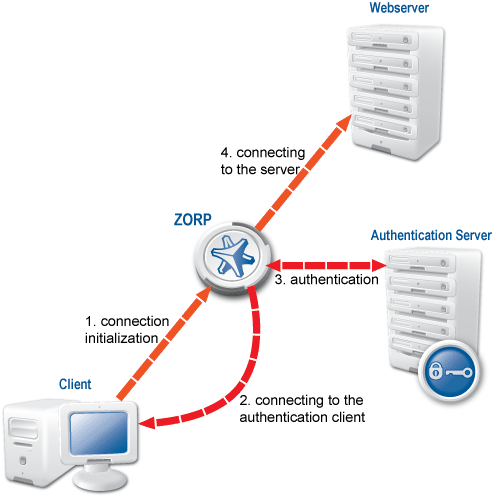
The aim of network authentication is to authenticate the connections initiated by the users in order to ensure that only the proper users can access the services. Basically there are two types of authentication:
Inband: Authentication is performed by the application level protocol — the data traffic required for the authentication is part of the protocol. Inband authentication is used for example in the HTTP, FTP, or SSH protocols. The protocols usually support different authentication methods — these are usually described in the specifications of the protocol.
Outband: Authentication is performed in a separate data channel completely independent from the protocol of the accessed service. Outband authentication is realized by the combination of the Authentication Agent (AA), AS, and PNS softwares. The advantage of outband authentication is that it can be used to authenticate any protocol, regardless of the authentication methods supported by the original protocol. That way strong authentication methods (for example, chipcards) can be used to authenticate protocols supporting only the weak username/password method (for example, HTTP).
2.2. Procedure – Outband authentication with PNS
Purpose:
PNS implements outband authentication according to the following procedure:
Steps:
The client initiates a connection towards the server.
PNS determines the service to be accessed based on the IP address of the client and the server. If authentication is required for the connection (an authentication policy is assigned to the service), PNS initiates a connection towards the client using the Authentication Agent protocol.
Depending on the authentication methods available (for example, for password-based authentication), the dialog of the authentication agent is displayed on the client machine. The user enters their username that the authentication agent forwards to PNS.
The PNS firewall connects to Authentication Server (AS) and retrieves the list of authentication methods enabled for the particular user. Multiple authentication methods can be enabled for a single user (for example, x509, Kerberos, password, and so on). The authorization of the user is also performed in this step, for example, the verification of the LDAP group membership.
PNS returns the list of available methods to the client. The user selects a method and provides the information (for example, the password) required for the method.
The authentication agent sends the data (for example, the password) to PNS that forwards it to AS.
AS performs the authentication and notifies PNS about the result (success/failure).
PNS returns the result to the client and — if the authentication was successful, builds a connection towards the server. In case of a failed authentication it terminates the connection to the client.
This section describes the installation and configuration of the authentication agent on Microsoft Windows and Linux platforms. The authentication agent has to be installed on every computer having access to authenticated services. The following platforms are supported:
Windows 10 LTSB (Long-Term Servicing Branch)
Windows Server 2012R2, 2016, 2019
Ubuntu 18.04 Bionic Beaver (64-bit only)
The agent has two components:
Authentication Agent Multiplexer: A daemon running in the background, accepting the connections coming from PNS and verifying the SSL certificates of PNS (if the communication is encrypted). In a multi-user environment the Multiplexer displays the dialog of the Authentication Agent on the desktop of the user initiating a connection requiring authentication.
Authentication Agent: This application collects the information required for the authentication, for example, the username, authentication method, password, and so on.
The installers automatically install both components. The components require approximately 5 MB of free hard disk space.
3.1. Procedure – Installing the Authentication Agent (AA) on Microsoft Windows platforms
Purpose:
The Authentication Agent (AA) installer is located in the \windows\satyr\ folder of the PNS CD-ROM, its latest version is also available from the website).
Steps:
-
Place the PNS CD-ROM into the CD drive and start the
satyr-setup.exefile located in the\windows\satyr\folder.Warning Administrator privileges are required to install the application.
-
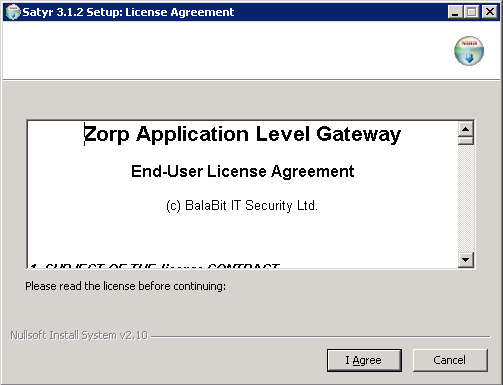
After the installer starts, the End-User License Agreement is displayed. To accept the End-User License Agreement, click . To cancel the installation at any time during the process, click .
-
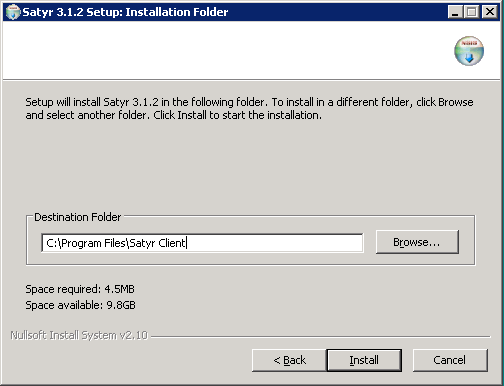
Select the destination folder for the application and click . The default folder is
C:\Program Files\Satyr Client. The Authentication Agent (AA) requires about 5 MB of free disk space. -
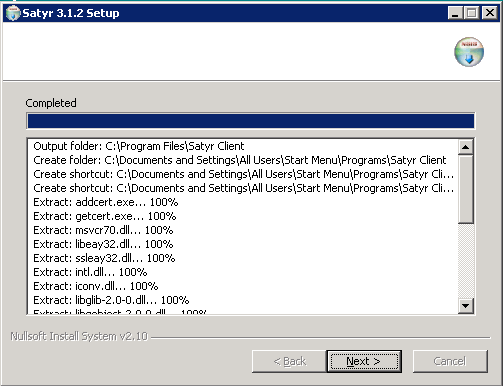
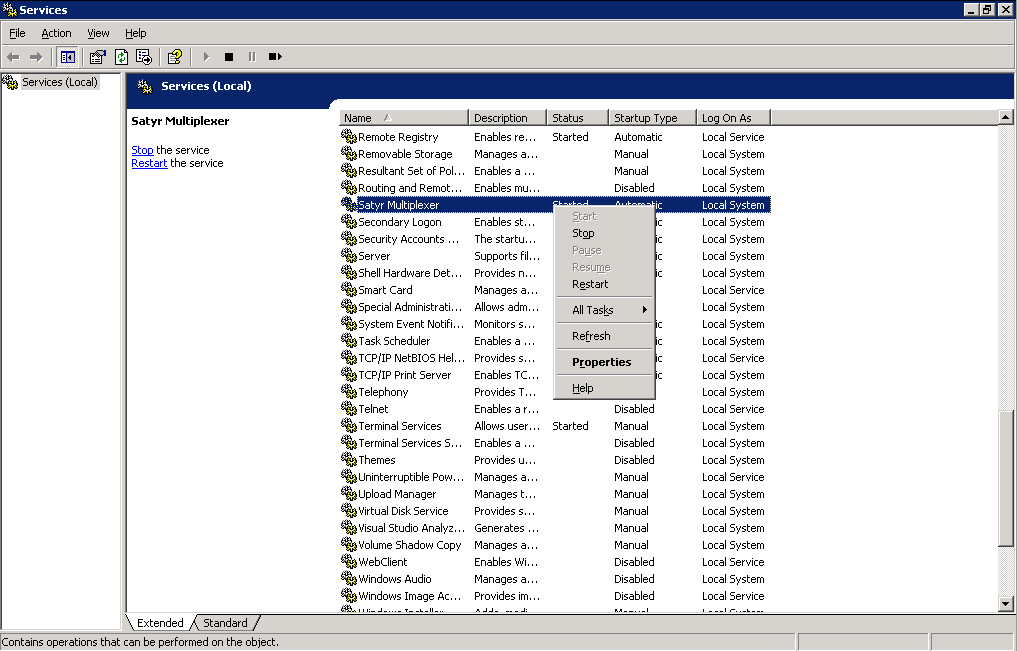
The installer copies the required files and registers a service called Satyr Multiplexer, which is started after the registration. To display details about the copied files, click .
-
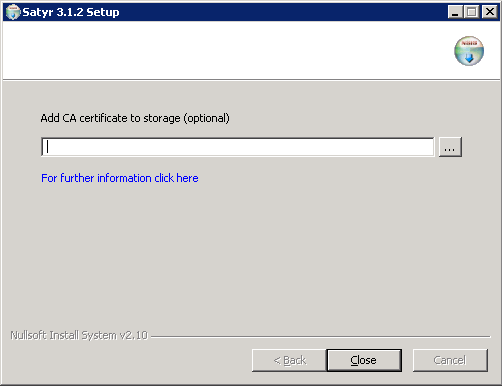
Optional step: If the authentication agent and PNS communicate through an SSL-encrypted channel (recommended), the certificate of the Certificate Authority (CA) signing the certificates of the PNS firewalls can be imported to the authentication agent. To import the CA certificate, click , select the CA certificate to import, then click .
Note The CA certificate has to be in
DERformat. It is not necessary to import the certificate during the installation, it can also be done later. For details about encrypting the agent-PNS authentication, see Section 4.1.3, Configuring SSL connections (Windows). After the installer has completed the above steps, click .
The Authentication Agent (AA) logo is displayed on the system tray, indicating that the application is running. It is also started automatically after each Windows startup.
3.2. Procedure – Installing Authentication Agent on Linux platforms
Purpose:
This section describes the installation of the Authentication Agent on Ubuntu Linux operating systems.
Steps:
-
As a first step, upgrade the apt package manager to support HTTPS connections. Make sure the following lines are in your
/etc/apt/sources.listfile:Note Replace
usernameandpasswordwith your username and password received from . If you are installing Authentication Agent manually, use your personal account credentials.-
For Ubuntu 10.04:
deb https://USERNAME:PASSWORD@apt.balasys.hu/ubuntu-bionic/zorp-1.0latest satyr
-
-
Issue the following commands as root:
apt update
apt install apt
-
Install the authentication agent. Issue the following commands as root:
apt update
apt install satyr
The above commands install the
satyr(Authentication Agent) and thesatyr-mpxd(Authentication Agent Multiplexer) packages. Authentication Agent Multiplexer is automatically started after the installation. It can be stopped or started by issuing the
systemctl stop satyr-mpxdorsystemctl start satyr-mpxdcommands, respectively.Authentication Agent is launched when X11 is started. It is important that it has to be started manually by running
satyr-gtk.
Some settings of Authentication Agent (AA) can be modified through the Windows Registry. Launch the registry editor by issuing the regedit command (either from a command prompt or through .
The parameters of the Authentication Agent are located under HKEY_LOCAL_MACHINE\SOFTWARE\BalaBit\Satyr.
The component column contains the name of the component related to the parameter. This component has to be restarted if a value is modified (that is, the Satyr Multiplexer service for Authentication Agent Multiplexer, the Satyr Client application for Authentication Agent).
To restart the Authentication Agent Multiplexer, right-click on the Satyr Multiplexer element of the list and select .
The following settings are available from the registry:
|
Name |
Description |
Default value |
Component |
||
|---|---|---|---|---|---|
|
aliasfile |
The name and path (for example, |
1 |
Multiplexer |
||
|
Automatic |
To enable the automatic Kerberos authentication without user interaction with the Authentication Agent, set it to |
1 |
Client |
||
|
Can Remember |
To save your credentials so that the client will fill the username and password automatically for later authentication attempts, set this parameter to |
1 |
Client |
||
|
Details |
The authentication agent displays the details of the connection in the popup dialog if this parameter is set to |
0 |
Client |
||
|
Has Preferences |
To enable the menu item in the system tray icon of Authentication Agent, set this parameter to |
1 |
Client |
||
|
Forget Password Interval |
To prevent unauthorized initiation of network connections through unattended machines, configure this parameter. Enter the number of minutes after which Authentication Agent deletes the stored password. |
1 |
Client |
||
|
Forget Password |
To store the authentication password indefinitely in the Authentication Agent, set this parameter to |
1 |
Client |
||
|
LOG_CLIENT |
The verbosity level of the authentication client, ranging from
|
0 |
Client |
||
|
LOG |
The verbosity level of the Authentication Agent Multiplexer, ranging from |
0 |
Multiplexer |
||
|
SSL |
To configure the Authentication Agent Multiplexer so that it only SSL-encrypted connections, set this parameter to |
1 |
Multiplexer |
To display the version number of the client, enter satyr-client.exe --version.
The Authentication Agent Multiplexer (satyr-mpxd.exe) has the following command-line options:
- --install_service
Register the Satyr Multiplexer service.
- --remove_service
Remove the Satyr Multiplexer service.
- --start_service
Start the Satyr Multiplexer service.
- --stop_service
Stop the Satyr Multiplexer service.
Authentication Agent Multiplexer and PNS can communicate through an SSL-encrypted channel. For this, a certificate has to be available on the PNS firewall that PNS uses to authenticate the connection to the Authentication Agent Multiplexer. The Authentication Agent Multiplexer verifies this certificate using the certificate of the CA issuing PNS's certificate, therefore the certificate of the CA has to be imported to the machine running the Authentication Agent.
| Note |
|---|
It is highly recommended to encrypt the communication between PNS and the authentication agent, because without it anyone can connect to the Authentication Agent Multiplexer, resulting in the authentication information obtained by unauthorized people. It is essential to use encryption when password authentication is used. |
4.1.3.1. Procedure – Encrypting the communication between PNS and the authentication agent (Windows)
Purpose:
To enable encryption between PNS and the authentication agent, complete the following steps. For the steps to be completed from MC, see Chapter 11, Key and certificate management in PNS in Proxedo Network Security Suite 1.0 Administrator Guide.
Steps:
Create a CA (for example,
AA_CA) using the Management Console (MC). This CA will be used to sign the certificates shown by the PNS firewalls to the authentication agents.Export the CA certificate into
DERformat.-
Generate certificate request(s) for the PNS firewall(s) and sign it with the created in Step 1.
Note Every firewall should have its own certificate. Do not forget to set the firewall as the Owner host of the certificate.
Distribute the certificates to the firewalls.
-
Install the Authentication Agent (AA) application to the workstations and import to each machine the CA certificate exported in Step 2.
There are three ways to import the CA certificate:
Using the installer of the Authentication Agent.
Manually using the addcert and getcert programs (see Procedure 4.1.3.2, Importing the CA certificate manually).
Using the Microsoft Management Console (see Procedure 4.1.3.3, Importing the CA certificate using Microsoft Management Console (MMC)).
Create the appropriate outband authentication policies in MC and reference them in the services of PNS. See Chapter 15, Connection authentication and authorization in Proxedo Network Security Suite 1.0 Administrator Guide for details.
4.1.3.2. Procedure – Importing the CA certificate manually
Procedure:
To import the certificate of the CA using the addcert and getcert programs, complete the following steps
Steps:
-
The certificate can be imported using the
addcert.exeprogram located in the installation folder of the Authentication Agent (C:\Program Files\Satyr clientby default). The program can be started from a command prompt or through . Supply the name and path of theDER-format certificate as an input parameter. For example,C:\Program Files\Satyr client\addcert C:\temp\Satyr_CA.crt
Note Running
addcert.exerequires administrator privileges. Verify that the certificate has been successfully imported by running getcert.exe. Running getcert.exe lists the Subject of all imported certificates.
Restart the Satyr Multiplexer service.
4.1.3.3. Procedure – Importing the CA certificate using Microsoft Management Console (MMC)
Purpose:
To import the certificate of the CA complete the following steps.
Steps:
-
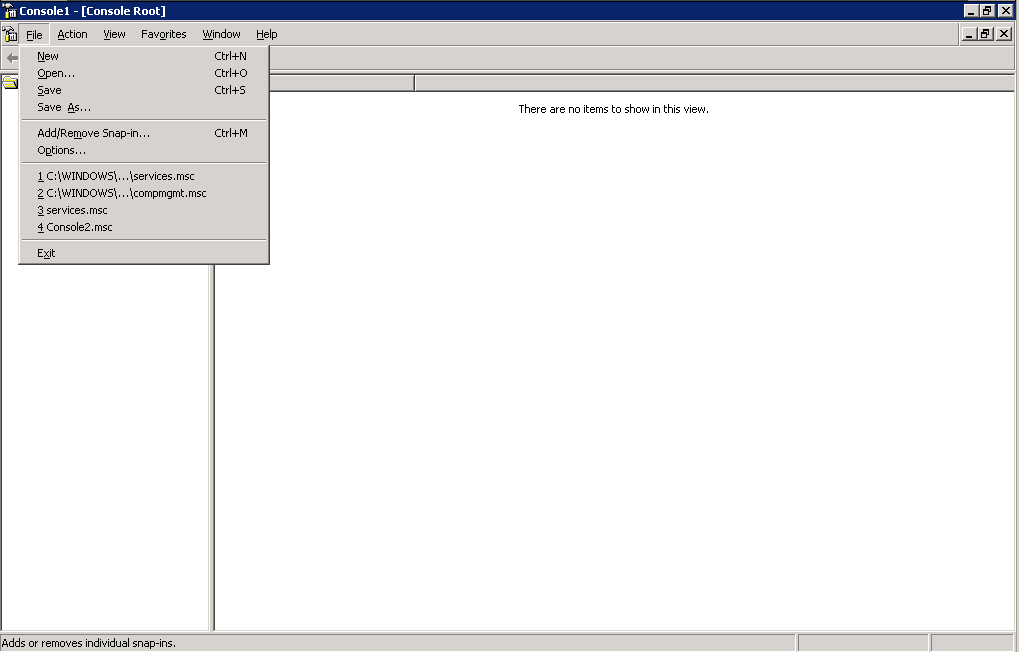
Start Microsoft Management Console by executing
mmc.exein .Note Running
mmc.exerequires administrator privileges. -
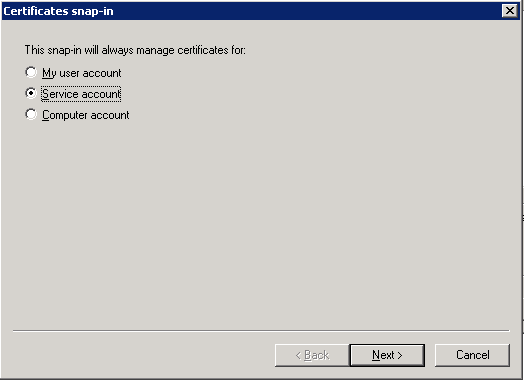
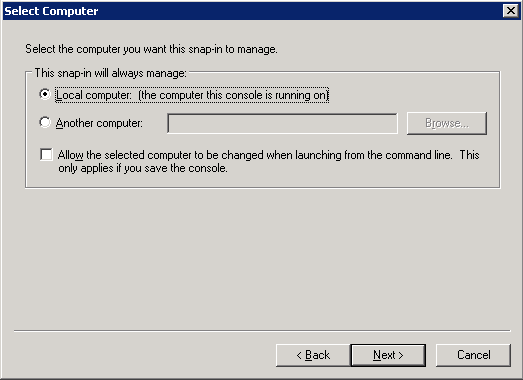
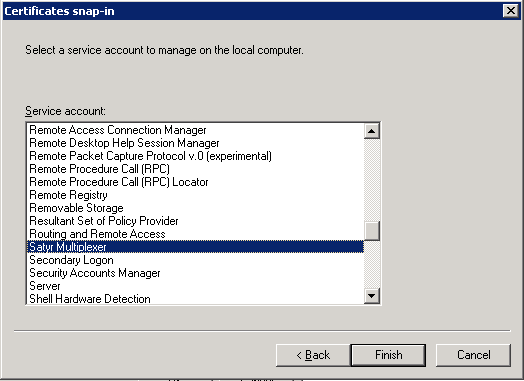
From the menu, select .
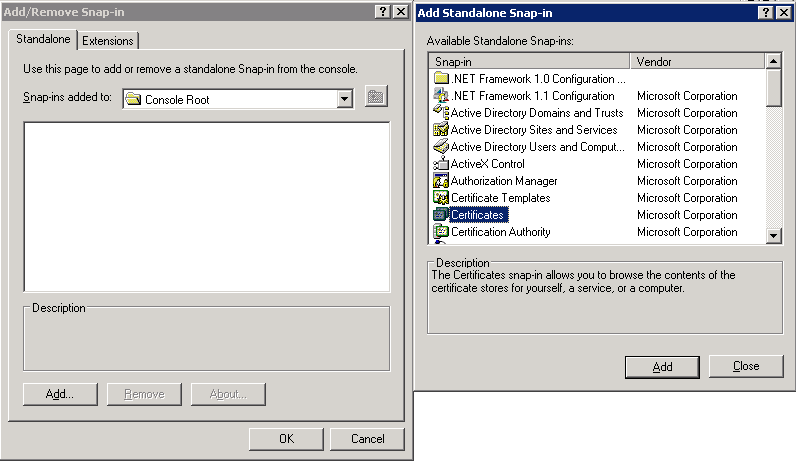
-
From the list, select and click .
-
Select and click .
-
Select and click .
-
Select the service and click .
With the above steps a snap-in module has been configured that enables to conveniently manage the certificates related to the Authentication Agent Multiplexer.
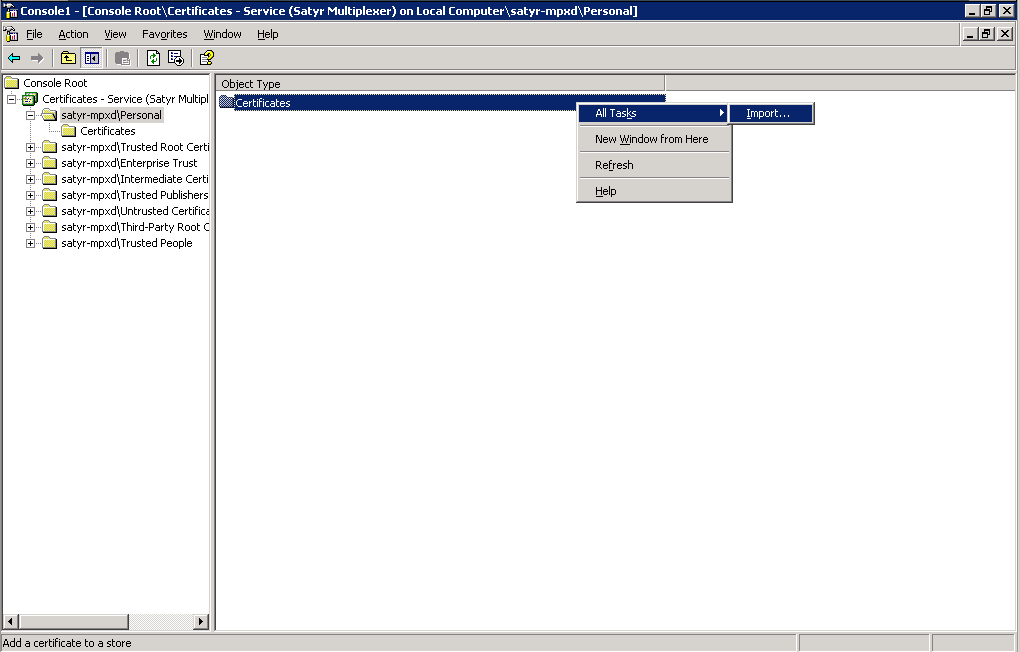
-
Navigate to , and click .
Right-click , navigate to . The is displayed. Click .
-
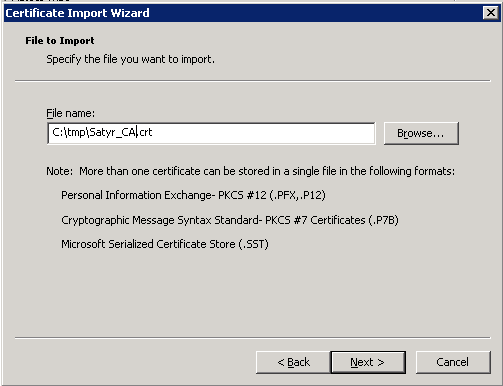
Select the certificate to import (for example,
C:/tmp/Satyr_CA.crt) and click .
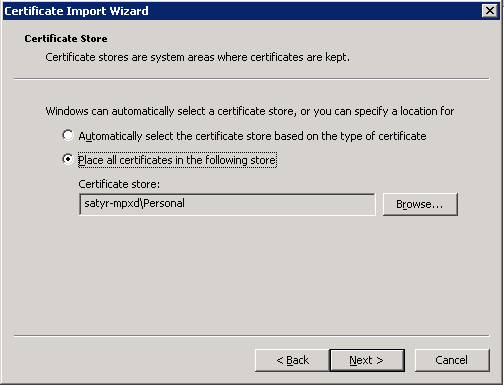
-
Windows offers a suitable certificate store by default, so click .
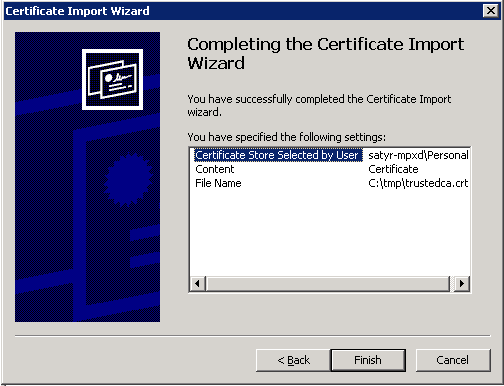
-
Click on the summary window and on the window that marks the successful importing of the certificate.
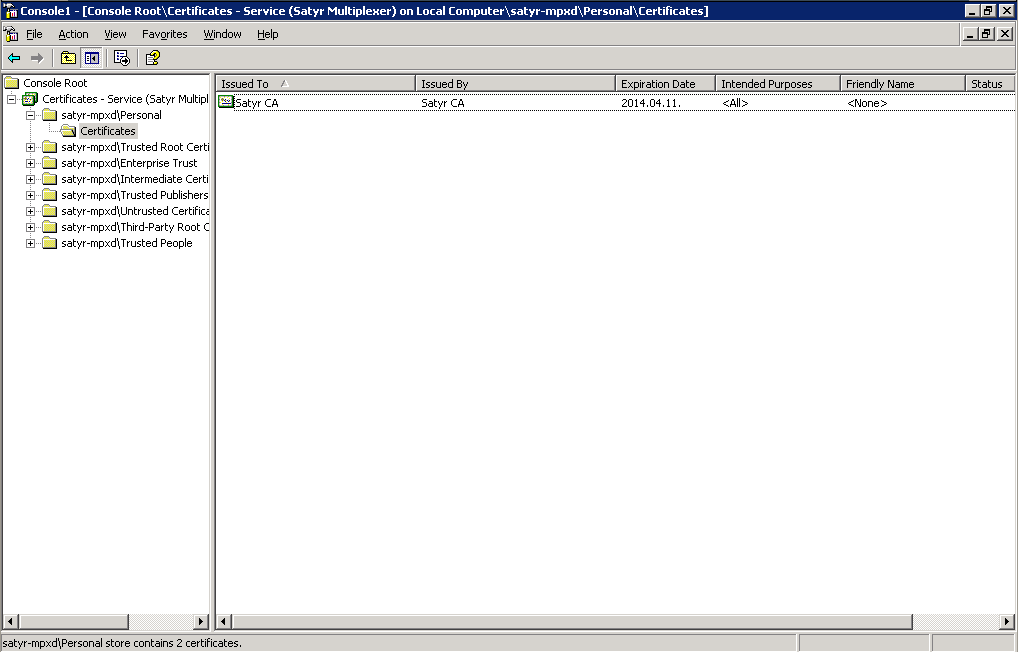
The main window of MMC is displayed with the imported certificate.
-
Restart the Satyr Multiplexer service. Navigate to . Scroll to Satyr Multiplexer and right-click on it. Select .
4.1.4. Procedure – Configuring X.509 certificate based authentication (Windows)
Purpose:
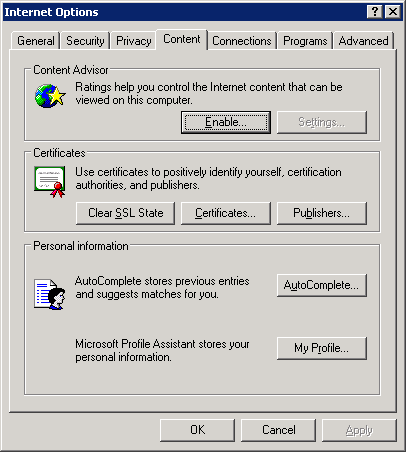
For authentication based on X.509 certificates the certificate and the private key of the user has to be deployed onto the workstation. Import the certificate of the user into their personal certificate store. This can be accomplished most easily through the Internet Explorer:
Steps:
Start Internet Explorer from the menu or from a command prompt by running iexplore.exe.
From the menu select .
-
On the tab click on .
-
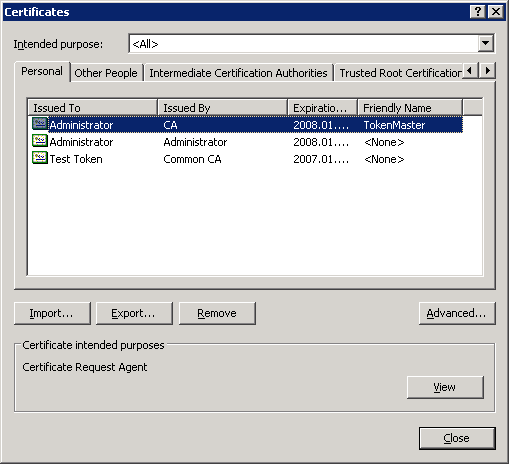
The certificates of the user are displayed on the tab. Click .
Note Hardware keys and tokens (for example,: Aladdin) having a suitable driver for Windows are also displayed in this store and can be used from the Authentication Agent.
Import the certificate using the Certificate Import Wizard.
The graphical client (satyr-gtk) has the following command line parameters:
- --help or -?
Display a brief help message.
- --version or -V
Display version number and compilation information.
- --automatic or -a
Enables automatic Kerberos authentication.
- --no-syslog or -l
Send log messages to the standard output instead of syslog.
- --verbose <verbosity> or -v <verbosity>
Set verbosity level to <verbosity>. The default verbosity level is
3; possible values are0-10.- --logtags; or -T
Prepend log category and log level to each message.
Satyr Multiplexer (satyr-mpxd) has the following command line parameters:
- --help or -?
Display a brief help message.
- --version or -V
Display the version number of satyr-mpxd
- --no-syslog or -l
Send log messages to the standard output instead of syslog.
- --verbose <verbosity> or -v <verbosity>
Set verbosity level to <verbosity>. The default verbosity level is
3; possible values are0-10.- --logtags; or -T
Prepend log category and log level to each message.
- --aliasfile; or -a
The name (including full path) of a text file (for example,
/tmp/aliases) used by Authentication Agent Multiplexer to redirect the authentication requests of certain users to a different user in multiuser environments. For example, to redirect all authentication request of therootuser toMainUseradd the following line to the file:root: MainUser.- --log-spec; or -s
Set verbosity mask on a per category basis. Each log message has an assigned multi-level category, where levels are separated by a dot. For example, HTTP requests are logged under http.request. The <spec> is a comma-separated list of log specifications. A single log specification consists of a wildcard matching log category, a colon, and a number specifying the verbosity level of that given category. Categories match from left to right. For example, --logspec 'http.*:5,core:3'. The last matching entry will be used as the verbosity of the given category. If no match is found the default verbosity specified with --verbose is used.
- --no-require-ssl; or -S
Turn off the SSL encryption of the communication between PNS and the Multiplexer.
- --bind-address; or -b and, --bind-port; or -p
The IP address and the port the Multiplexer is accepting connections on.
- --crt-dir; or -t
Path of the directory containing the certificate of the CA that issued the certificate of the PNS firewall.
- --crl-dir; or -r
Path of the directory containing the Certificate Revocation List (CRL) related to the above CA.
To enable encryption between PNS and the authentication agent complete the following steps. For the steps to be completed from MC, see Chapter 11, Key and certificate management in PNS in Proxedo Network Security Suite 1.0 Administrator Guide.
4.2.2.1. Procedure – Encrypting the communication between PNS and the authentication agent (Linux)
Steps:
Create a CA (for example,
Satyr_CA) using the Management Console (MC). This CA will be used to sign the certificates shown by the PNS firewalls to the authentication agents.Export the CA certificate into
PEMformat.-
Generate certificate request(s) for the PNS firewall(s) and sign it with the CA created in Step 1.
Note Every firewall should have its own certificate. Do not forget to set the firewall as the Owner host of the certificate.
Distribute the certificates to the firewalls.
-
Install the Authentication Agent (AA) application to the workstations and import to each machine the CA certificate exported in Step 2.
To import the CA certificate complete the following steps:
-
Create the
/etc/satyr/cadirectory:mkdir /etc/satyr/ca
Copy the certificate exported into
PEMformat in Step 2 into the/etc/satyr/cadirectory.-
Verify the hash of the CA certificate:
openssl x509 -in /etc/satyr/ca/cacert.pem -hash -noout
-
Create a symlink to the certificate file using the hash received in the above step. Add the
.0suffix (or the next free suffix if.0is already taken) to the file as an extension, for example,ln -s /etc/satyr/ca/cacert.pem /etc/satyr/ca/6d2962a8.0
-
Restart the Satyr Multiplexer daemon:
/etc/init.d/satyr-mpxd restart
The authentication client is now ready to accept encrypted connections from PNS.
-
Create the appropriate outband authentication policies in MC and reference them in the services of PNS. For details, see Chapter 15, Connection authentication and authorization in Proxedo Network Security Suite 1.0 Administrator Guide.
For authentication based on X.509 certificates the certificate and the private key of the user has to be deployed onto the workstation. Create a directory called .satyr in the home folder of the user and copy the certificate and private key of the user in PEM format into this directory. Use the cert.pem and key.pem filenames, or create symlinks with these names pointing to the certificate and the key file. The authentication agent will automatically use the certificate found in this directory.
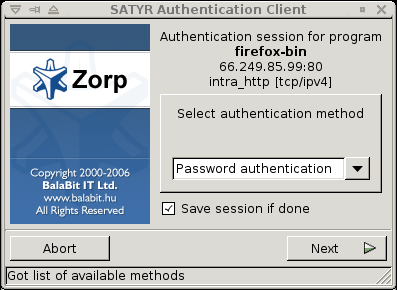
5. Procedure – Using the Authentication Agent (AA)
Purpose:
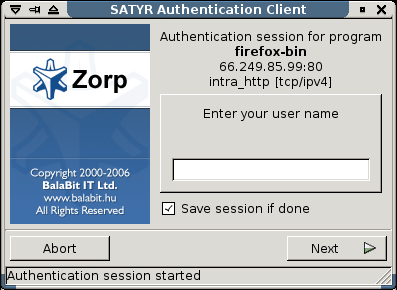
When the user launches an application that requires authentication (for example, a web browser, e-mail client, and so on) the PNS firewall automatically displays the authentication client on the user's screen.
The client displays the name of the service requiring authentication (intra_http in the above example), and — provided that the administrator enabled it — further details of the connection (for example, destination IP address).
Steps:
-
To save your credentials so that the client will fill the username and password automatically for later authentication attempts, select . For details on configuring password storage period length and deleting a prevously saved password, see Procedure 6, Configuring Authentication Agent preferences (Windows).
To cancel the authentication at any time, click .
>
Enter your username in the field and click .
-
Select the authentication method to use from the list. The list displays only the methods that are available for this user.
To authenticate with a password, select .
-
To use Kerberos authentication, select .
Note When using Kerberos authentication the authentication client is not displayed if you have configured in . For details, see Procedure 6, Configuring Authentication Agent preferences (Windows).
To authenticate with an X.509 certificate, select .
-
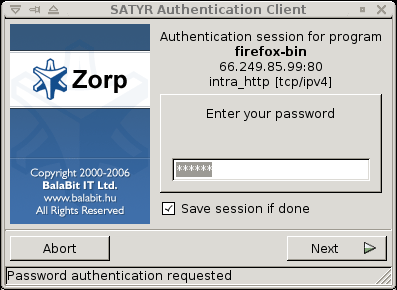
Provide the information required for the selected authentication method. For example, for , enter your password.
Note After successful authentication, the window of the authentication client is closed automatically, and the connection to the target server is established. If the authentication fails, the client displays an error message.
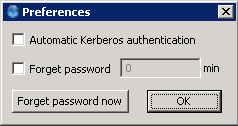
6. Procedure – Configuring Authentication Agent preferences (Windows)
Purpose:
Authentication Agent starts automatically after Windows starts up, and places its icon on the system tray. To configure Authentication Agent preferences, complete the following steps.
| Note |
|---|
To display the version number and other information about Authentication Agent, right-click the system tray icon and click . |
Steps:
-
Right-click the system tray icon and click
To enable automatic Kerberos authentication without user interaction with the Authentication Agent, select . In this case, Authentication Agent will use the username provided during Windows login.
To prevent unauthorized initiation of network connections through unattended machines, configure . Enter the number of minutes after which Authentication Agent deletes the stored password.
To immediately delete the stored password from the Authentication Agent, click .